How to Get the Most Out of Notifications in Windows 11

If you don't manage your Windows 11 notifications, you'll either be overwhelmed by them or miss crucial updates when it counts. Here's how to take control of your Windows 11 notifications so you're not getting too little or too many.
Where do you access notifications in Windows 11?
Windows 11 organizes all your notifications in the Notification Center, located on the taskbar. To access it:
- Click on the date and time in the bottom-right corner of the taskbar.
- Alternatively, press the Windows logo key + N to open the Notification Center pane on the right side of the screen.
From here, you can:
- Turn on "Do Not Disturb" by clicking the bell icon with the "Zzzz" symbol. This will silence notifications until you turn the setting off.
-
Access Notification Settings by clicking the "Notification Settings" link that appears after enabling "Do Not Disturb."
 How to customize notifications
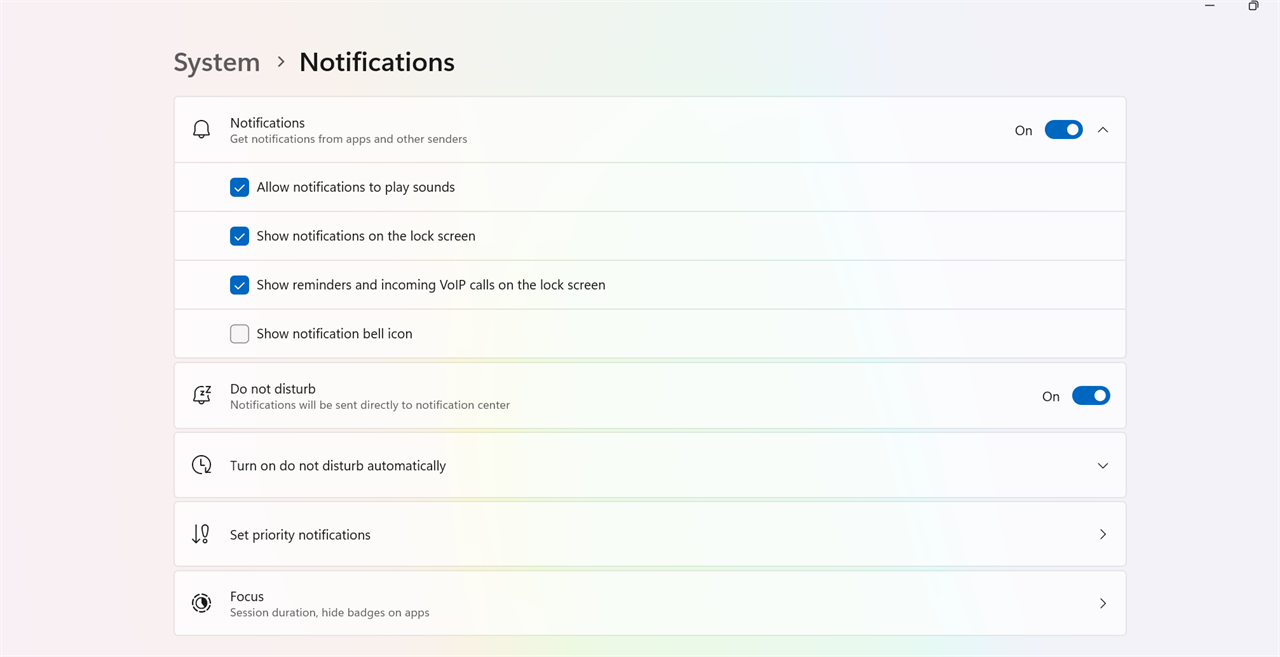
Click on the link mentioned above or press Windows key + I, then click on System and navigate to Notifications. To tailor your notifications:
- Open Settings by pressing Windows key + I, then go to System > Notifications.
- You’ll see two main sections:
- General Notification Settings: Customize system-wide preferences.
- App-Specific Settings: Fine-tune notifications for individual apps.
The general settings section is at the top, followed by individual app settings at the bottom. The general settings allow you to be pretty granular and clicking on Notifications gives you control to turn off notifications sounds, whether they appear on the lock screen, and more. You can also:
- Enable or disable notification sounds.
- Choose if notifications appear on the lock screen.
- Decide if reminders and incoming calls show on the lock screen.
- Enable or disable pop-up banners.
If it's not already on, click the Do Not Disturb button, and notifications will be turned off.
The "Turn on Do Not Disturb automatically" section lets you schedule quiet times or enable Do Not Disturb during specific activities, such as:
- Playing games.
- Using a second display for presentations.
- Mirror your schedule to ensure you’re not disturbed at night or during focused work hours.
Under Set Priority Notifications, you can fine-tune which alerts are allowed to bypass Do Not Disturb. Options include:
- Allowing calls and reminders.
-
Granting select apps permission to display notifications even in Do Not Disturb mode.
 How to use Focus with notifications in Windows 11
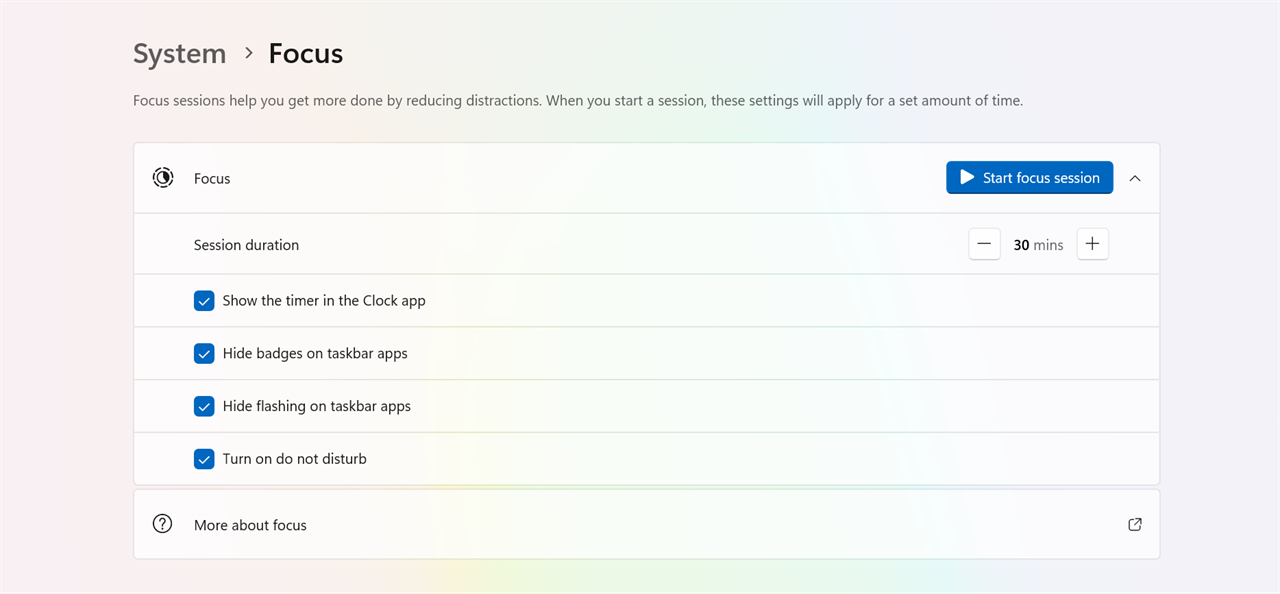
The final section is Focus. In this area, you can start Focus Sessions, allowing you to choose a specific duration during which notifications are restricted to your liking. I find Focus Sessions beneficial for accomplishing tasks in bursts.
Go to Settings > System > Focus to set up Focus Mode.
Start a Focus session and configure the duration. During the session:
- Notifications are minimized based on your preferences.
-
A handy timer appears on your screen to track progress.
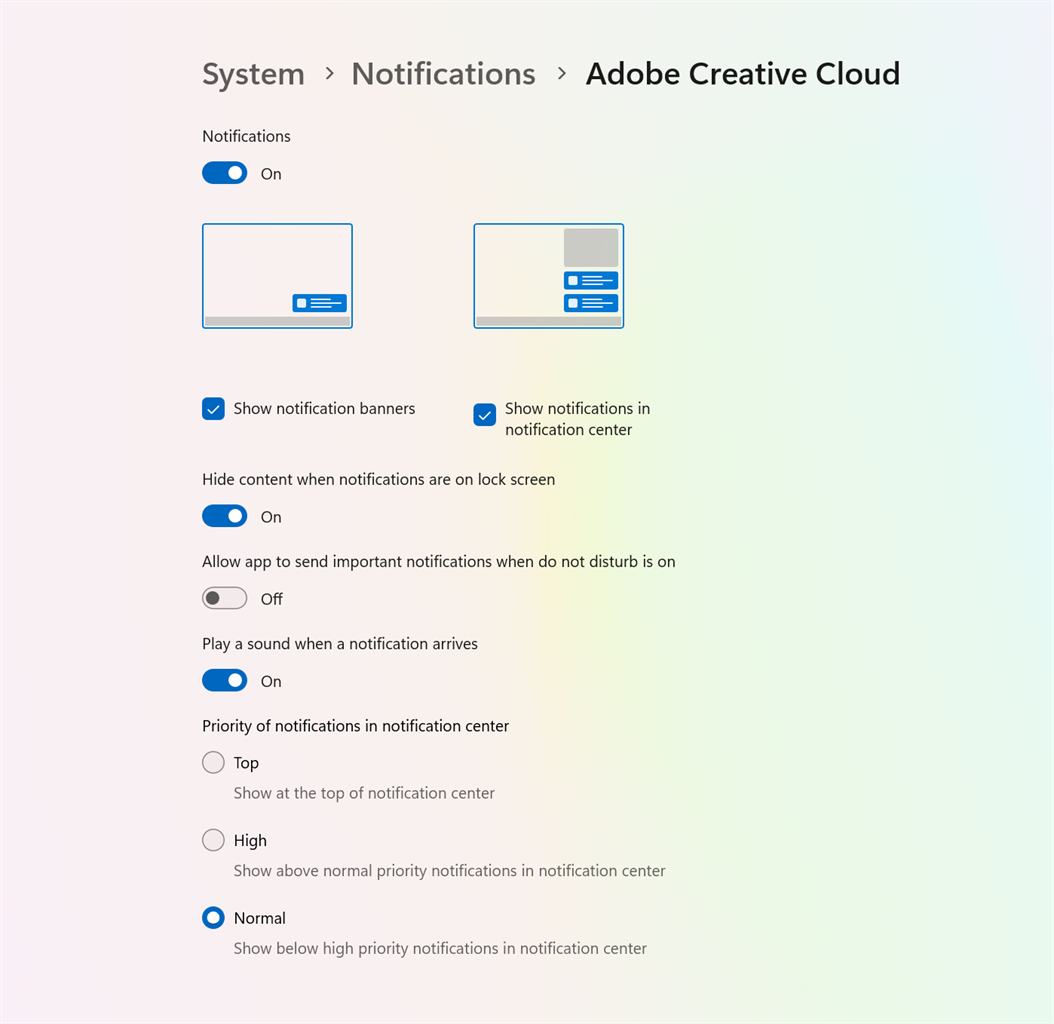
Customizing app-specific notifications
Scroll down in the Notifications settings menu to find a list of installed apps for which you can customize notification preferences. By clicking on any app name, you can access various settings options. Clicking on an app lets you:
- Turn notifications on or off for that app.
- Enable or disable banners (pop-ups).
- Choose if notifications appear on the lock screen.
- Adjust sound preferences for the app’s notifications.
- Set priority levels for the app in the notification list.
Pro Tip: Quickly Adjust Notifications via Quick Settings
For a faster way to tweak notification settings:
- Click the Quick Settings panel (the icons near the clock, such as Wi-Fi or volume).
- From here, you can toggle Do Not Disturb or access Notification Settings directly.
Make the most of Windows 11 notifications
Taking the time to fine-tune your Windows 11 notifications will save you from both drowning in alerts and missing important updates. Once you figure out the settings that work best for your schedule and preferences, it becomes a seamless experience. You’ll stay informed when you need to be and keep distractions to a minimum when you don’t, letting you make the most of Windows 11 without unnecessary interruptions.
Read more: AI Tools and Tips
- What is Meta AI? A Capable Chatbot That’s 100% Free
- Hands-on with ChatGPT o1-preview, OpenAI's Latest Innovation
- How to Get Started with Copilot for Microsoft 365
- Getting started with LM Studio: A Beginner's Guide
- Meet Claude, the Best AI You've Never Heard of
- How to Get NVIDIA Chat with RTX: Local AI for Everyone
Eric Franklin worked at CNET for over two decades, eventually becoming Editorial Director of CNET's Tech Reviews team. He now works as an SEO consultant and freelance writer.