

The Complete Guide to Customizing Windows 11 Display, Desktop, and UI Settings

Windows 11 is a versatile, capable operating system, but it truly comes into its own when you use its customization features to make it look and work the way you want it to. Those options and tweaks can be buried away in menus and settings screens, though, so knowing exactly how to customize Windows to your liking takes a little learning.
 Photo: Jacob Bobo
Emphasis on the little, though. Here’s our straightforward and comprehensive guide to Windows customization, adjusting display, desktop, and UI settings to make it look and feel exactly how you like it.
Note: These instructions will primarily focus on Windows 11, as Windows 10 is very similar and the steps are almost identical in most cases. However, we will include Windows 10 tips where appropriate, if the instructions differ enough to warrant it.
How to change screen resolution

Source: Microsoft/Jon Martindale
It’s important to run your monitor at its native resolution to enjoy the best possible picture quality. Here’s how to change your screen resolution in Windows 11.
- Ensure that the monitor is connected to the PC and powered on.
- Right-click, or, for touch interfaces, press and hold on the desktop and select Display Settings from the pop-up menu. Alternatively, navigate to Settings > System > Display.
- If multiple monitors are connected, select the display to be changed at the top of the screen.
- Scroll down the page to find “Scale and Layout.” Next to “Display Resolution,” select the drop-down box for a list of compatible resolutions – the monitor’s native resolution will be listed as “Recommended.”
- Select one of the resolutions. For 1080p, look for 1,920 x 1,080; for 1440p, look for 2,560 x 1,440, and for 4K, look for 3,840 x 2,160.
How to change screen brightness settings

Source: Microsoft/Jon Martindale
Changing the screen brightness can make a big difference for on-screen clarity, helping fight against glare in bright environments and increase visibility.
To change an external or desktop monitor’s brightness, you can use its built-in controls. However, for laptop displays, follow these steps to adjust their brightness.
- Select the “Quick Settings” button on the desktop – the network, sound, and audio icons in the bottom-right-hand corner.
- Use the slider to adjust the display’s brightness manually.
Alternatively, most laptop keyboards come with brightness adjustment keys built into the F-row. These can be used to raise or lower the brightness in individual steps, without having to go into the settings. The FN (Function) key, or similar, may need to be pressed for the F-Row to function this way, otherwise it may just work as a traditional F1, F2, etc.
How to enable the on-screen keyboard
Source: Microsoft/Jon Martindale
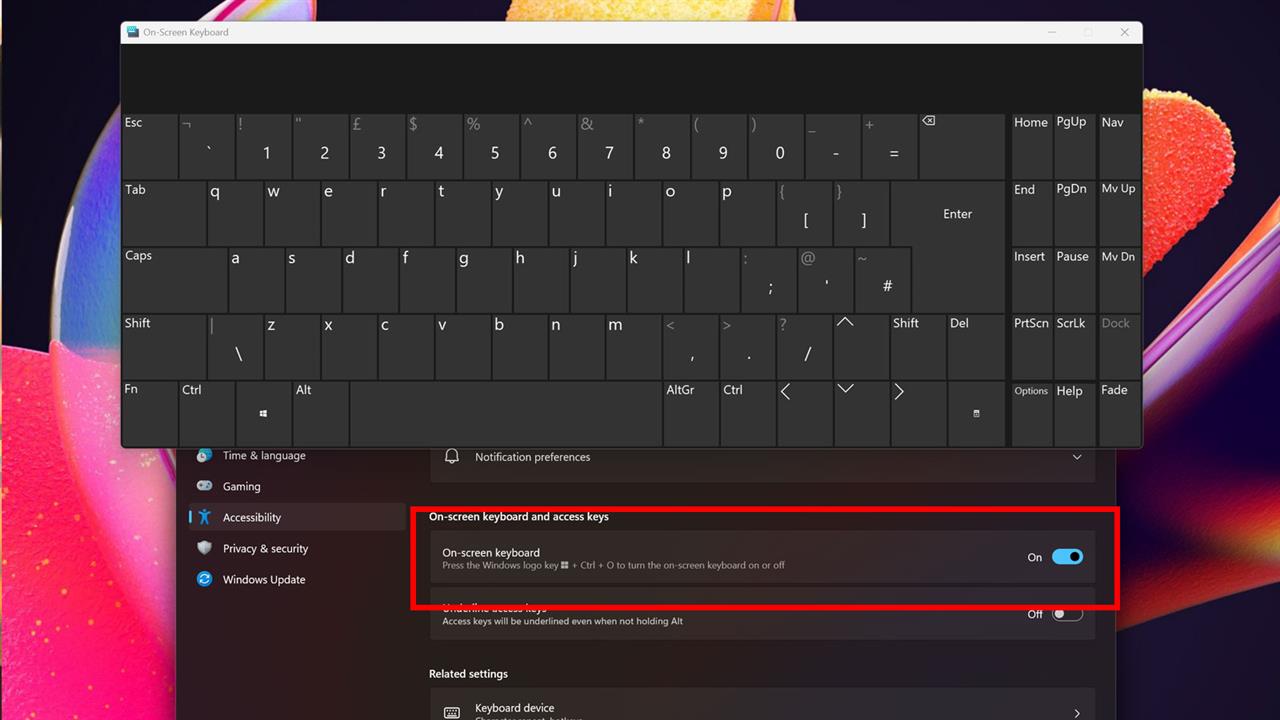
If your keyboard suddenly stops working, or you just can’t find the key you need on it, the on-screen keyboard is a useful substitute. Here’s how to enable it (and turn it off again afterwards).
- If a keyboard is available, press the Windows Key + Ctrl + O at the same time. Press that same combination again to turn the keyboard off.
- Alternatively, if a keyboard is unattached or unusable, the on-screen keyboard can be turned on by navigating to Start > Settings > Accessibility > Keyboard. Then look under “On-screen keyboard and access keys,” for the “On-screen keyboard,” option. Toggle it to On.
- In Windows 10, navigate to Start > Settings > Ease of Access > Keyboard, then toggle the on-screen keyboard On from there.
How to change the desktop background

Source: Microsoft/Jon Martindale
Changing your desktop background, or wallpaper, is a great way to make your PC feel fresh and new, and ensure that everything on your desktop is easily legible. You can have Windows change your desktop background dynamically, or set it as a static image or color, whatever you like.
- Right-click, or, for touch interfaces, press and hold on the desktop and select Personalization from the pop-up menu. Alternatively, navigate to Settings > Personalization.
- Select Background.
- Next to “Personalize your background,” use the drop-down menu to choose a background. If Picture is selected, Windows will offer a selection of images to choose from, or a custom photo can be used by selecting Browse Photos. To cycle through images, select Slideshow from the drop-down menu.
- For dynamically changing images that Windows will select from, choose Windows spotlight from the drop-down.

Source: Microsoft/Jon Martindale
-
Alternatively, for a flat background color, select Solid Color from the drop-down menu. Windows will present a selection of colors to choose from. Alternatively, select View Colors for a near-infinite selection of color options.
How to create desktop shortcuts

Source: Microsoft/Jon Martindale
Some people love a really tidy and spartan desktop, while others like to fill it with shortcuts to all their favorite apps and folders. Whatever your desktop preferences, it’s still useful to be able to create new desktop shortcuts for whatever you need quick access to.
- To create a shortcut to an application, first the original launcher must be found. This is the executable file that actually opens the application. It can be found by manually searching using the File Explorer, or by searching for it in the Windows Search bar.
- Once the location has been found, a shortcut can be created. Right-click on the app’s .exe file. Select Show more options from the drop-down menu, then select Create Shortcut. The shortcut can be moved to the desktop by dragging and dropping it, or cutting and pasting. It can also be renamed to something else by selecting it and pressing F2 or right-clicking and selecting Rename.

Source: Microsoft/Jon Martindale
-
The second method for creating a shortcut is to right-click or tap and hold (for touch interfaces) the desktop background and select New > Shortcut. In the pop-up window that appears, either type in the location of the file or folder to be linked or use the Browse button to find the file. Once the correct location of the file has been found, select Next. Choose a name for the shortcut, then select Finish to create it.
How to change font size

Source: Microsoft/Jon Martindale
Making the font size bigger in Windows can be a great way to make text easier to read, especially if you’re running a higher resolution monitor, like 4K. Here’s how to do it.
Windows 11
- Navigate to Start > Settings > Accessibility > Text Size.
- Next to “Text size,” use the slider to adjust the size of the text. The preview window can be used to get an idea of how big the text will be when the scale is applied.
- Once the desired text size has been found, click the Apply button. Don’t be concerned if a blue-screen appears immediately after saying “Please wait,” as it is just the font adjustment. After a few seconds it will finish and the computer’s font size will have changed.
Note: It is possible to adjust font size and icon scale in the same action. Go to Settings > System > Display. Under the heading “Scale and layout,” and next to “Scale,” select the preferred percentage from the drop-down menu.
Windows 10

Source: Microsoft/Jon Martindale
Changing the font size in Windows 10 is slightly different. Follow these steps:
- Navigate to Start > Settings > Ease of Access.
- On the Display page that opens, look for the section that says, “Make text bigger.” Use the on-screen slider to adjust the size of the text, then press Apply to save the changes.
How to change the mouse pointer size
Source: Microsoft/Jon Martindale
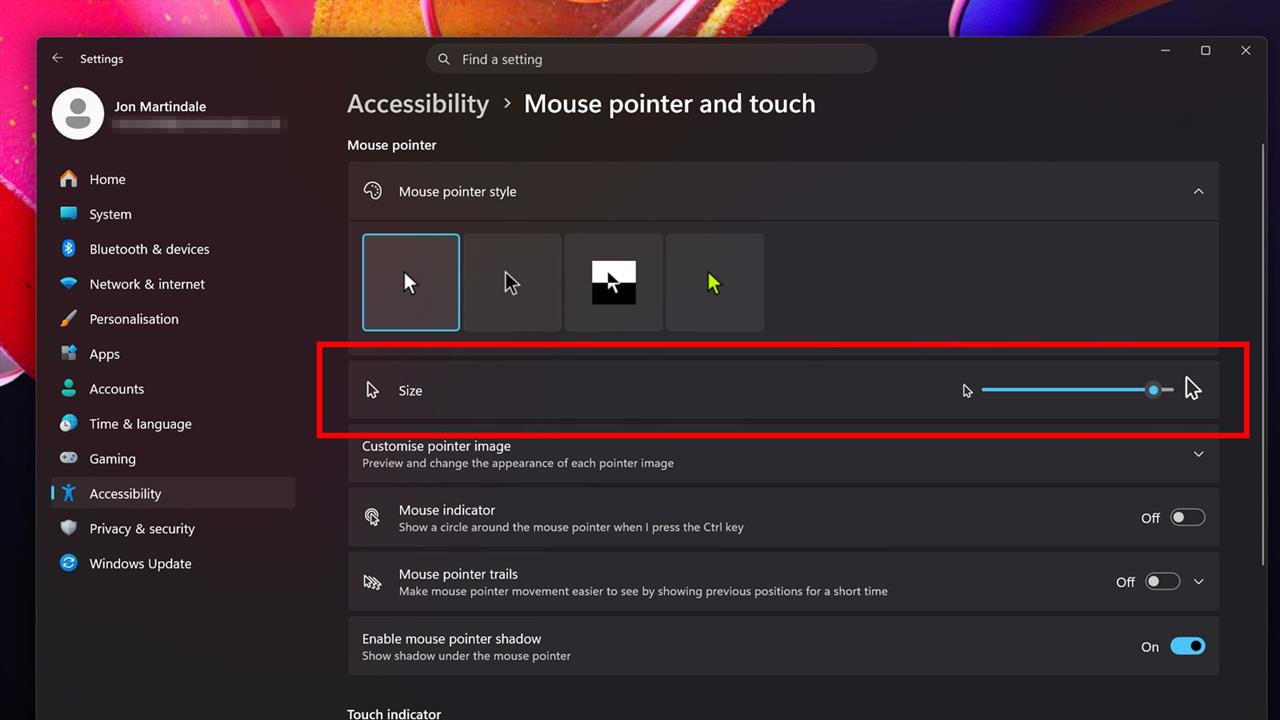
If you find the mouse a little hard to track, or just want it to be more obvious where you’re clicking, here’s how to change the mouse pointer’s size.
Windows 11
- Navigate to Start > Settings > Accessibility > Mouse pointer and touch.
- Under the “Mouse pointer,” heading, next to “Size,” use the slider to increase or decrease the size of the mouse pointer.
Windows 10
Source: Microsoft/Jon Martindale
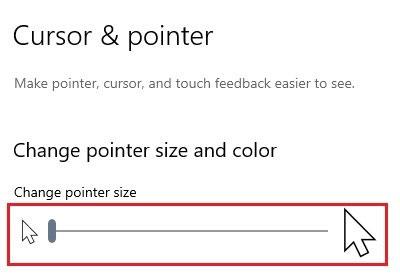
- Navigate to Start > Settings > Ease of Access > Cursor and pointer.
- Scroll down to find the “Change pointer size and color,” heading. Next to “Change pointer size,” use the slider to adjust the mouse pointer’s size.
How to disable mouse acceleration
Source: Microsoft/Jon Martindale
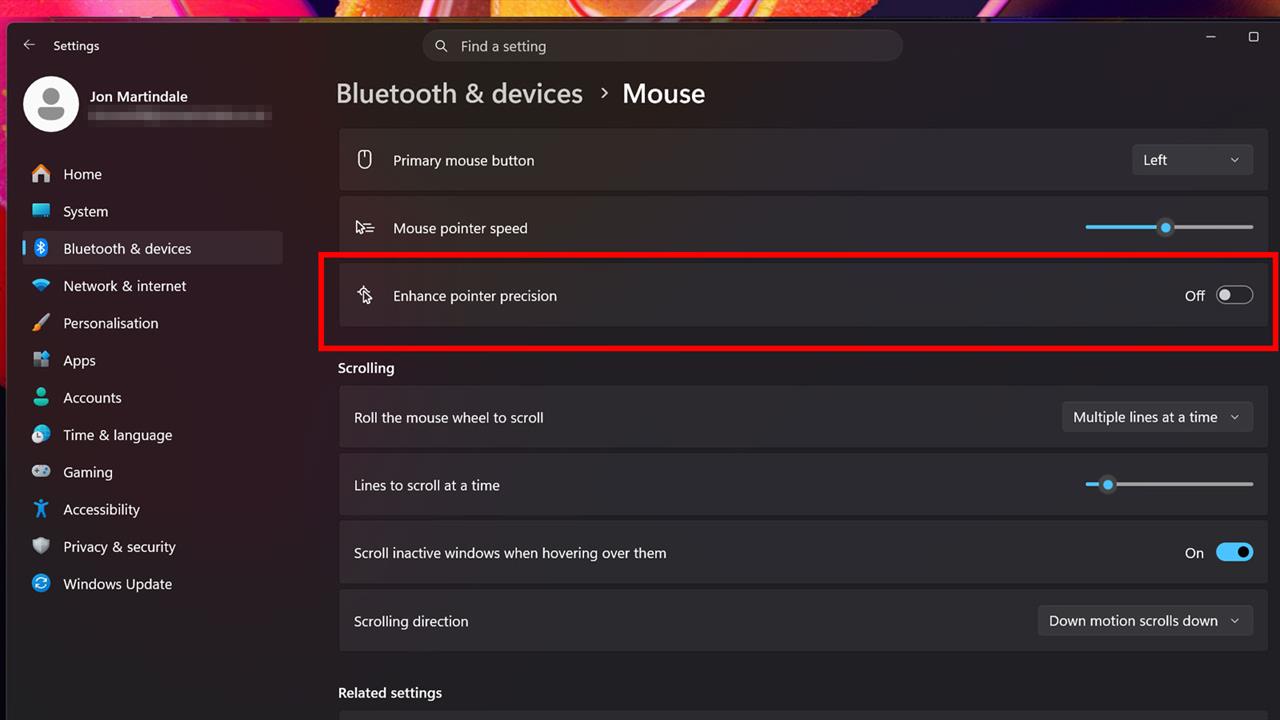
For gamers who take their play seriously, mouse acceleration can introduce frustrating inaccuracies. Turning it off makes the mouse on screen move linearly, 1:1 with your own movements, rather than adjusting speed on the backend based on how quickly the mouse is moving. This makes mouse movements more consistent, which can make a notable difference to accuracy, especially when playing at high-speed and intensity, like in esports titles.
- Navigate to Start > Settings > Bluetooth and Other devices.
- Scroll down to find “Mouse.” Select it. Note: This is not “Devices: Mouse, keyboard, pen…”
- Locate “Enhance pointer precision.” If it's “On,” select the toggle to turn it Off.
How to change default desktop icons

Source: Microsoft/Jon Martindale
Windows has a number of default icons like the Recycle Bin, File Folders, This PC, and Network icons, but they are all customizable. Here’s how to change them to something else:
- Navigate to Start > Settings > Personalization > Themes.
- Select Desktop icon settings.
- Select which icon(s) to be changed using the check boxes, then select Change icon.
- Browse through the icon options and select the desired icon. Then select OK.
- Repeat this process for each icon to be changed.
If you ever want to change them back to their originals, just select the Restore Default button on the Desktop Icon Settings window.
How to customize the Start menu

Source: Microsoft/Jon Martindale
Microsoft overhauled the Start menu with Windows 11, but there are plenty of customization options if you would rather it looked or behaved differently. Here’s how to make the most of them, though you can find even more in our How to Customize the Windows 11 Start Menu guide.
Windows 11
- Pin or unpin shortcuts: Find any app shortcuts to be added to the Start menu. Right-click or tap-and-hold them, and select Pin to Start. For any icons in the Start that should be removed, right-click/tap-and-hold them and select Unpin from Start.
- Organize apps into folders: Creating app folders can be a useful way to group them together. To create one, simply drag one icon on top of another and release it. The folder can then be renamed. More apps can be added to the folder by dragging and dropping them into it, or removed by dragging them out of it. Copy/Paste also works.
- Customize the layout: In the “All” section, there are different views for installed apps. Select from Category, Grid, and List, depending on preferences. The Start Menu can be launched with all apps on view, or with pins and folders.
- Move Start to the side: For the classic Windows look with the Start menu in the bottom left (or somewhere else), right-click or tap and hold on the task bar, then select Taskbar settings. Select Taskbar behaviours, then next to “Taskbar alignment,” use the drop-down menu to select where it should appear.
Windows 10
- The height and width of the Windows 10 Start menu can be customized by clicking and dragging it from the edge.

Source: Microsoft/Jon Martindale
- To change Tile options, right click on the specific tile to be changed. Tiles can be unpinned from the start menu or removed completely. They can also be resized into: Small, Medium, Wide and Large. Live tiles, like “News,” which grab information from the internet and display or scroll through its feed, can be disabled by selecting Turn live tile off.
- To customize tile location, simply click or tap on the tile and hold for a second, then drag it to where it should go.
- There are a few more additional options for the Start menu, which can be found in Personalization settings. To access them, right click on the Desktop and choose Personalize. In the personalization settings, select Start. There are additional options for the Start menu, including ways to turn off groups of apps from appearing, like most used or recently installed.
And those are the basics for customizing your Windows machine, be it a laptop, desktop, or somewhere in between. But if you still have more questions about setting up your Windows machine or if you just have worries about the health of your computer or device, our experts can help! Schedule an appointment with the Knowledge Bar by visiting our Services webpage.
More from MC News
- The Complete Guide to Essential Browser Settings
- Complete Guide to Windows 11 Disk Management
- Run AI Locally: The Best LLMs for 8GB, 16GB, 32GB Memory and Beyond
- How to Build a PC with a Hardline Water-Cooling Loop
- 3D Print a Mac Mini Monitor Mount
- Keyboard 101: Intro to Computer Keyboards
Jon Martindale is a freelance technology journalist and writer from Gloucestershire, UK. He's written for a range of publications over a 20-year career, including DigitalTrends, USNews, Forbes, and Lifewire, among many others. Over that time he's written countless how-to guides, best-of lists, hands-on reviews, and in-depth op/ed features.
He has been building and working with computers since his teens, and loves nothing more than trying out the latest components and gadgets to see what they can do. When he isn't staring at a monitor, he can be found chasing after with his two young children, playing board and roleplaying games, or walking his French bulldog cross.


