Code Your Own Raspberry Pico Wireless Humidity Monitor
Keep an eye on your filament moisture levels with this easy project.Maker Projects
Excess humidity can render entire rolls of filament completely useless. That’s why maintaining optimal humidity levels is crucial for ensuring high-quality 3D prints. Excess moisture in filament can lead to issues like stringing, poor layer adhesion, and surface imperfections.
However, it’s hard to always keep an eye on the moisture levels of your filament. So, we developed a compact, wireless humidity monitoring device designed to sit within the Bambu Labs AMS. This device allows for real-time monitoring of humidity levels inside the filament storage area, ensuring the filament remains in ideal conditions.
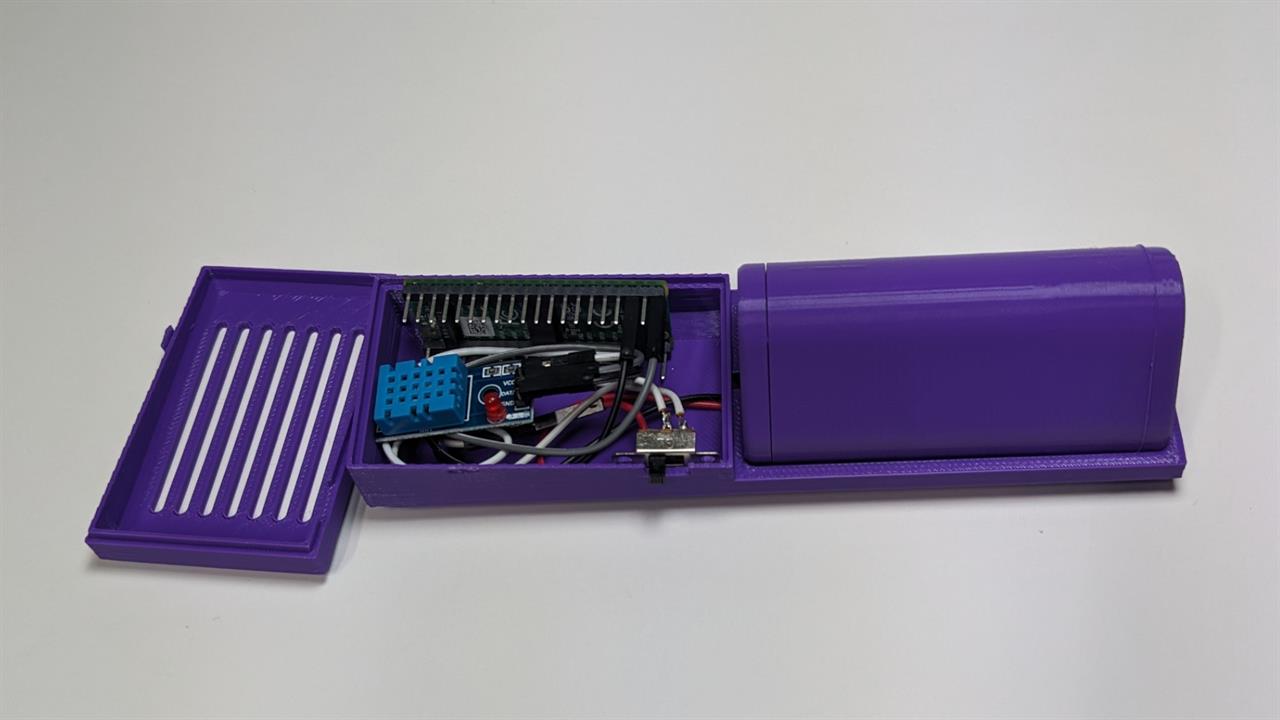 Photo: Micro Center
 Design Goals and Constraints
- Compact and Non-Intrusive: The device needed to fit within the AMS module's existing structure without obstructing the filament storage or feeding mechanisms. To achieve this, we limited the device's maximum diameter to 50 mm, allowing it to be placed within the center section of filament rolls.
- Wireless Data Transmission: To avoid modifying the AMS module and to enable flexible placement of the device, we opted for wireless data transmission. This approach eliminated the need for visible displays or wired connections, allowing the device to be hidden within the AMS while transmitting data to an external server.
- Battery-Powered Operation: The device uses 3 AA batteries for power, offering ample runtime while maintaining a compact form factor. This battery-powered design ensures that the device remains independent of the AMS's power supply, further simplifying integration.
- Modular and Reusable Design: We designed the device with modularity in mind, featuring a 3D-printed enclosure and a battery case that can be reused in other projects. This approach streamlined the assembly process and provided flexibility for future modifications and upgrades.
- Iterative Development: We recognized the importance of continuous improvement and designed this project as the first iteration of the humidity monitor. We prioritized creating a simple, readable Python script to get the device running, leaving room for future enhancements in both functionality and security. The principle of "don't get it perfect, just get it running" was central to our development process.
Materials Needed
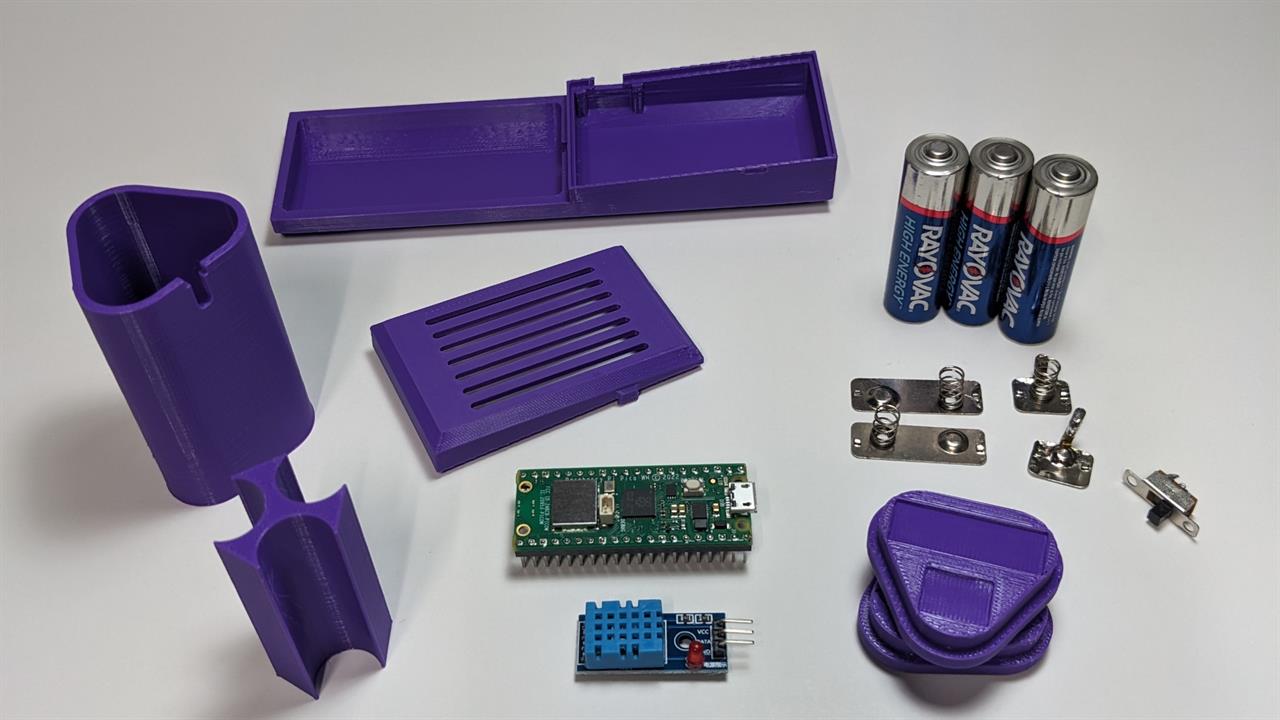 Photo: Micro Center
 - Raspberry Pi Pico WH
- DHT11 Module
- 3 AA Batteries
- 2 Sets of AA Battery Contacts
- One SPST Slide Switch
- Jumper Wires
- Breadboard for Testing
- STL file: Raspberry Pi Pico AMS Wireless Humidity Monitor
Required Software
To set up and run this project, you'll need the following software installed on your PC:
- Python: The server script that receives data from the Pico WH is written in Python. Install Python from the official website and ensure that It is added to your system's PATH during installation.
- Thonny IDE: Thonny is an Integrated Development Environment (IDE) that makes writing and uploading Python scripts to the Raspberry Pi Pico WH easy. You can download Thonny from the official website. After installation, you can use Thonny to write, upload, and run the script on your Pico WH.
- Driver for Raspberry Pi Pico: If you're using Windows, you might need to install a driver for the Raspberry Pi Pico WH. The driver allows your PC to recognize the Pico when connected via USB. The driver can be downloaded from the Raspberry Pi website.
With these tools installed, you can set up your environment to program the Raspberry Pi Pico WH and run the server script on your PC.
Circuit Connection Breakdown
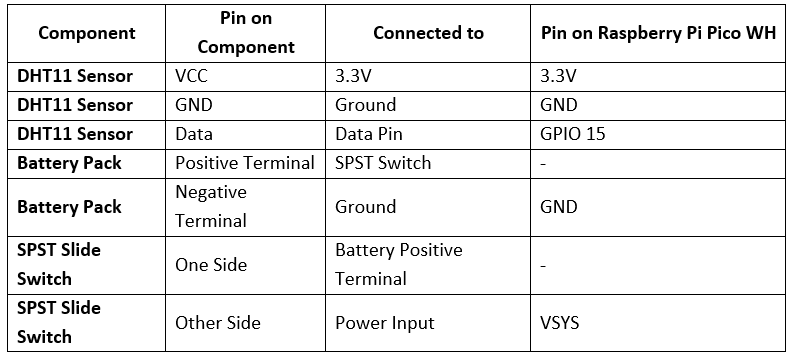
This simple circuit lets the device read humidity data and send it wirelessly to a remote server.
Printing the Pico and Battery Case
We designed the Raspberry Pi Pico and battery case to be printed without support, making the process straightforward and accessible. Both parts can be printed in a single session using standard PLA settings. Here are the recommended settings:
- Material: PLA
- Layer Height: 0.2 mm
- Infill: 15%
- Supports: None required
These settings balance strength and print speed well, ensuring that the case fits securely and protects the electronics while remaining easy to assemble.
Creating and Operating the Scripts
This section explains how to create both the server script and the Pico script, load the script onto the Raspberry Pi Pico WH, and operate the program.
Server Script Setup
The server script runs on a PC and listens for incoming data from the Raspberry Pi Pico WH. Here's how to create and run the server script:
Create the Server Script:
- Open Thonny IDE and create a new file named server.py.
- Copy the following Python code into the file:
server_ip = '0.0.0.0' # Listen on all interfaces
server_port = 12345
S = socket.socket()
s.bind((server_ip, server_port))
s.listen(1)
log_file.write("Timestamp, Temperature, Humidity\n")
while True:
conn, addr = s.accept()
print("Connection from", addr)
data = conn.recv(1024).decode()
if data:
print("Received data: ", data)
log_file.write(f" {time.time()}, {data}\n")
log_file.flush() # Ensure data is written to the file
conn.close()
Run the Server Script:
- Run the script with Python on your PC
- The server will now listen for incoming data from the Pico WH.
Create the Pico Script:
- Open the Thonny IDE and connect your Raspberry Pi Pico WH.
- Create a new file and copy the following code into it:
import socket
import utime
from machine import Pin
import dht
# Wi-Fi configuration
SSID = 'your_SSID'
PASSWORD = 'your_PASSWORD'
def log_message(message):
with open("/log.txt", "a") as log_file:
log_file.write(message + "\n")
def connect_wifi():
log_message("Connecting to Wi-Fi...")
wlan = network. WLAN (network.STA_IF)
wlan.active(True)
wlan.connect(SSID, PASSWORD)
while not wlan.isconnected():
utime.sleep(1)
log_message('Connected to Wi-Fi: + str(wlan.ifconfig()))
return wlan.ifconfig()
# DHT11 setup
sensor = dht.DHT11(Pin(15))
# Server configuration
server_ip = 'your_PC_IP_address
server_port = 12345
def send_data(temperature, humidity):
data = f"Temperature: {temperature}C, Humidity: {humidity}%"
try:
s = socket.socket()
log_message("Socket created")
sensor = dht.DHT11(Pin(15))
# Server configuration
server_ip = 'your_PC_IP_address'
server_port = 12345
def send_data(temperature, humidity):
data = f"Temperature: {temperature}C, Humidity: {humidity}%"
try:
s = socket.socket()
log_message("Socket created")
s.connect((server_ip, server_port))
log_message("Socket connected")
s.send(data.encode())
log_message("Data sent: " + data)
s.close()
except Exception as e:
log_message("Failed to send data: + str(e))
def main():
while True:
log_message("Starting main loop")
connect_wifi()
log_message("Measuring temperature and humidity")
sensor.measure()
temperature = sensor.temperature()
humidity = sensor.humidity()
log_message(f"Measured Temperature: {temperature}C, Humidity: {humidity}%")
send_data(temperature, humidity)
log_message("Waiting for 60 seconds before next reading")
utime.sleep(60)
if _name_ == "__main__":
main()
Replace 'your_SSID', 'your_PASSWORD', and 'your_PC_IP_address' with your actual Wi-Fi SSID, password, and the IP address of the server (PC).
Upload the Script to the Pico WH:
Save the script as "main.py" directly onto the Raspberry Pi Pico WH. This will ensure the script runs automatically when the Pico is powered on.
Security Disclaimer
This project uses a simple socket connection for data transmission, but some security risks exist. The data is sent unencrypted, and the Wi-Fi credentials are hardcoded into the script, making it vulnerable to interception or unauthorized access. While this setup is fine for a basic prototype, consider implementing encryption and secure credential storage if you plan to deploy this device in a more sensitive environment. Remember, the goal was to "get it running," with future iterations focused on enhancing security.
Testing and Results
Once the device is set up on the breadboard, power it on using the slide switch. The Pico WH will connect to Wi-Fi, read humidity data from the DHT11 sensor, and transmit the data to your server. You can monitor the data on your PC, ensuring that your filament remains in ideal conditions within the AMS module.
Accessing the Log File on the Pico
If you've included the logging functionality to your script, you can easily access the log file saved on the Pico WH to review the recorded data:
Connect the Pico WH to Your PC:
- Use a USB cable to connect the Raspberry Pi Pico WH to your computer.
Open Thonny IDE:
- Launch the Thonny IDE. If your Pico is properly connected, it should be recognized in the lower-right corner of the Thonny window.
Navigate to the File System:
- In Thonny, click on the file browser pane on the left side of the window. You should see the Pico WH listed as a connected device.
Locate the Log File:
- Browse the file system on the Pico to find your log file (e.g., log.txt). Double-click the file to open it within Thonny.
Review and Save the Data:
- The log file displays the recorded data directly within Thonny. You can review the entries or save the file to your PC for further analysis.
This process allows you to easily access and analyze the humidity data collected by your Pico WH.
This project is a functional prototype for monitoring humidity within a 3D printer's filament storage area. Future enhancements include adding sensors, optimizing power consumption, and improving security. However, the current setup provides a simple and effective solution for maintaining filament quality.
Remember: "Don't get it perfect; just get it running." This project embodies that principle, providing a solid foundation on which to build and improve over time.
See more 3D printer and maker projects:
- Painting in Bambu Studio: Printing with Multicolor Filament
- How To Clean and Cure Resin 3D Prints
- FDM vs. Resin 3D Printing: Which is Right for You?
Comment on This Post
See More Blog Categories
Recent Posts
Mesh Network vs. Router: What’s the Difference?
Are you fed up with Wi-Fi dead zones and spotty connections? In this guide, we’ll pit traditional routers against mesh networks to show you which solution delivers seamless, high-speed coverage tailored to your home, devices, and budget—without breaking the bank.
Continue Reading About Mesh Network vs. Router: What’s the Difference?


