How to Use Generative AI in Photoshop
The latest AI capabilities in Adobe apps make creating easier than ever.News
Adobe’s Photoshop is already a powerful image editor, but it’s recently evolved, using the incredible capabilities of generative AI to enhance, expand, and change images in exciting ways. Adobe already offers its Firefly image generation service for free, with a handful of generative credits per month, but if you have Adobe’s Photoshop beta, you can use generative AI there too.
You can even use it to add new elements to images, delete or change elements, select the subject, or just remove the background quickly and easily by hitting a few buttons.
Interested in taking generative AI in Photoshop for a spin? Here’s how to use it.
How to access generative fill in Photoshop
If you just want to test out generative AI in Photoshop, you can take advantage of the seven day free trial, but just remember to cancel it before the end of the week or you’ll end up paying full price for the first month.
If you’re looking for a more official test run, you’ll need to have a subscription to Adobe’s Creative Cloud package, with Photoshop as part of your bundle. You can get Photoshop for around $20 a month, or there are packages that include additional apps and services for more.
As long as you have a Photoshop subscription, though, you’ll get generative AI credits as part of it, though your subscription level does change the quantity you receive per month. With the standard Photoshop and Photography subscription packages, you get 500 generative credits to use per month. If you pay for all of Adobe’s Creative Cloud apps in the bundled package, however, you get 1,000 credits – along with a range of other features.
Once you’ve signed up to the respective package, you’ll need to download the latest version. Sign in to Adobe’s website and download the Creative Cloud app. Once it’s installed, use it to download the latest version of Photoshop.
Note that while you can still download the Photoshop beta if you want to run the latest features, including any new and in-testing generative AI features, you can just download the standard release of Photoshop. Generative AI is now officially out of beta.
How to activate generative AI in Photoshop
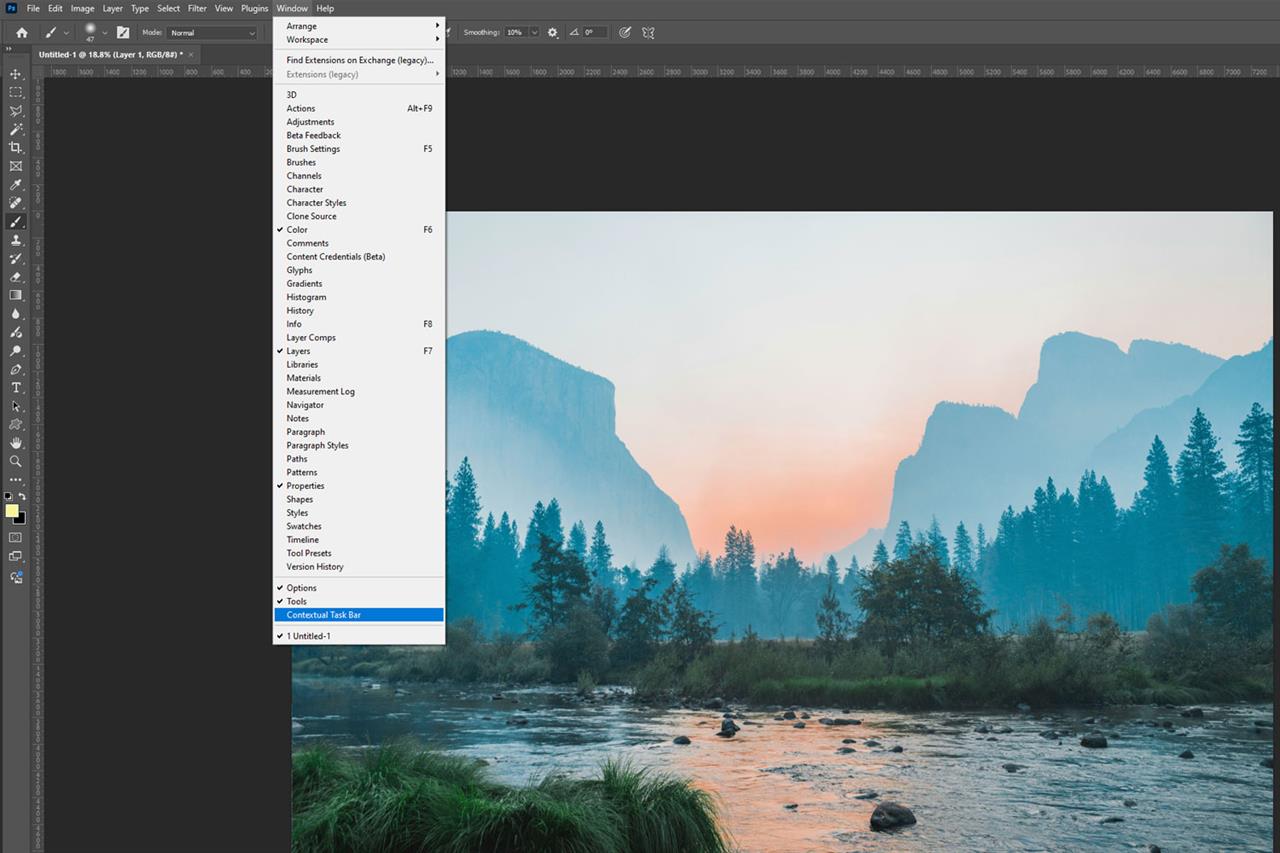
Photo: Jon Martindale/Adobe
To get started using generative AI in Photoshop, you may need to activate the toolbar, depending on your current Photoshop version. To start it, select the Window tab at the top of the screen, then scroll all the way down to the bottom of the list and select Contextual Taskbar. It’s next to the Options and Tools menu options.
This will pop out a small toolbar with all the important generative AI functions within Photoshop. It’s this that you’ll use for all the other actions described below. You can move the bar around using its grab-tab on the left-hand side, letting you choose its placement on the screen. The generative AI Contextual Taskbar cannot be pinned to an existing toolbar, though.
How to use generative AI in Photoshop
The Contextual Taskbar has a few unique functions which we’ll look at here, but the first and primary function is its text-prompt generative AI capabilities. These allow you to select an area of an image (or the entire thing), and use natural language text inputs to either add to the image or alter it in some way.
To do that, use the Contextual Taskbar’s built-in selection tools, or any of Photoshop’s other selective tools, to select a portion of an image. Alternatively, don’t select anything and any inputs you give will apply to the entire image.
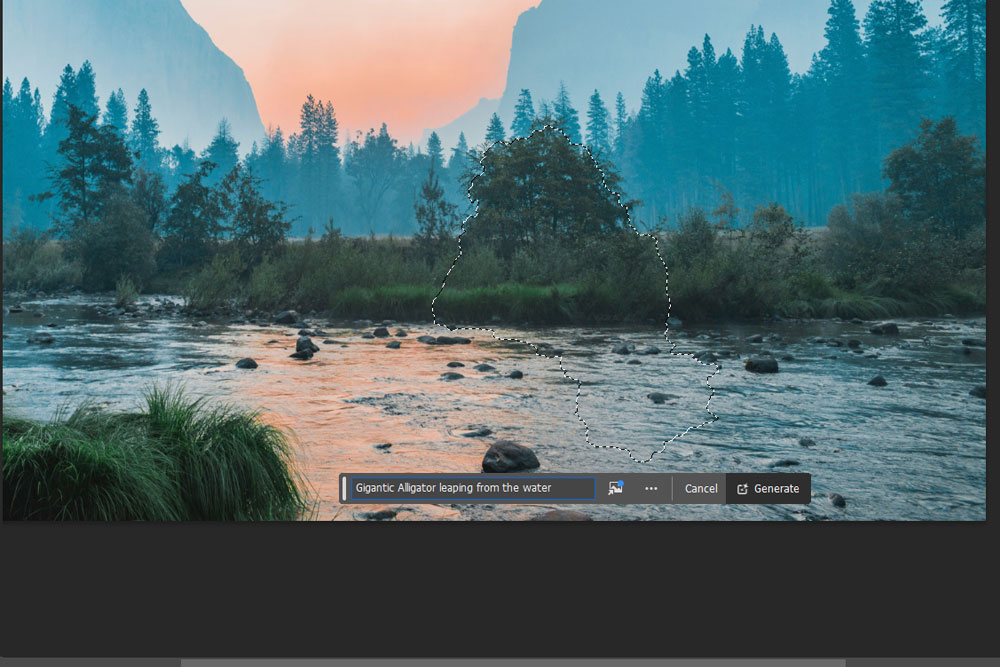 Photo: Jon Martindale/Adobe
Once you’ve made a selection (or not) select Generative Fill. Then select the text prompt and type in what you want to see. In this instance, we’re going to add an alligator leaping from the river. If you want to give the AI a help with the overall shape and structure of what you want it to make, you can add a reference image using the button next to the text prompt field.
When ready, select Generate and wait for the AI to complete its calculations, which are currently cloud-based.
When it’s finished, you’ll be presented with the first iteration of what the AI can deliver. If you’re happy with it, perfect, but if not, look to the right in the Properties window, under Variations. There you’ll find three iterations from the AI, and you can choose between them by selecting the different variations.
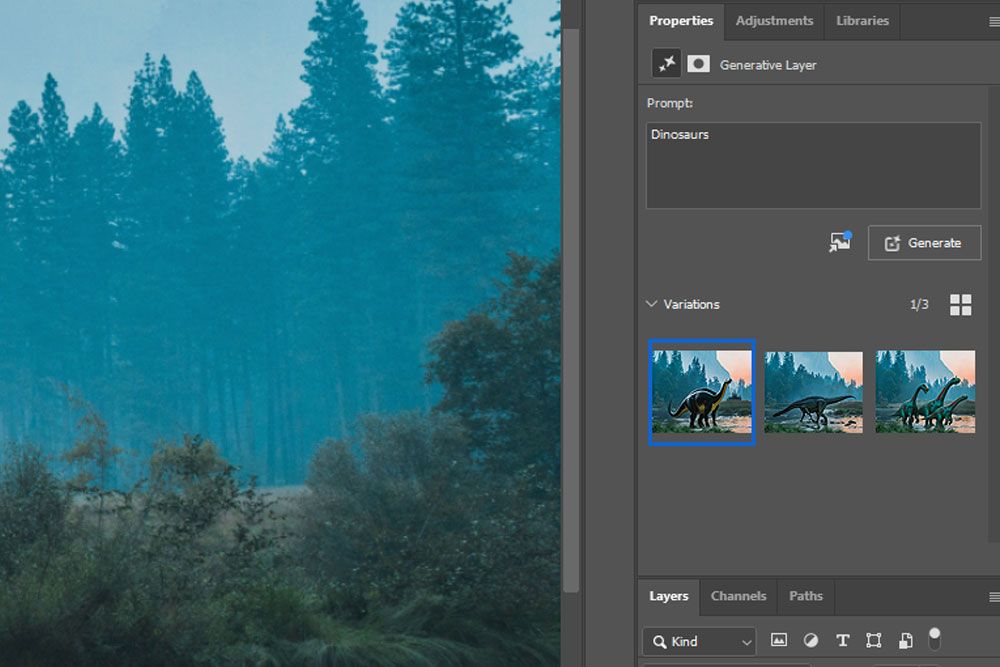
Photo: Jon Martindale/Adobe
Pick one you like and then you can continue adding more generative AI content. You can have a lot of fun with this feature if you just keep adding new things. The new AI content will be in its own layer. When you’re finished, just flatten or save it as you would any other image.

Photo: Jon Martindale/Adobe
How to delete content with generative AI in Photoshop
As great as generative AI is at adding new content to images, it’s also pretty amazing at removing them. That’s arguably a more important capability, too, since cleaning up existing images and photos is one of the most common uses for Photoshop in both professional and hobbyist settings. Here’s how to use it.
Open an image that you want to remove something from. In this case, we’re going to try to remove the coffee cup and other desk objects from this image with the laptop, leaving a clean and tidy surface. You can use Photoshop’s range of selection tools to select what you want to remove from an image, or if you have something specific, you can always use the Contextual Taskbar’s Select Subject to have the AI select it for you.
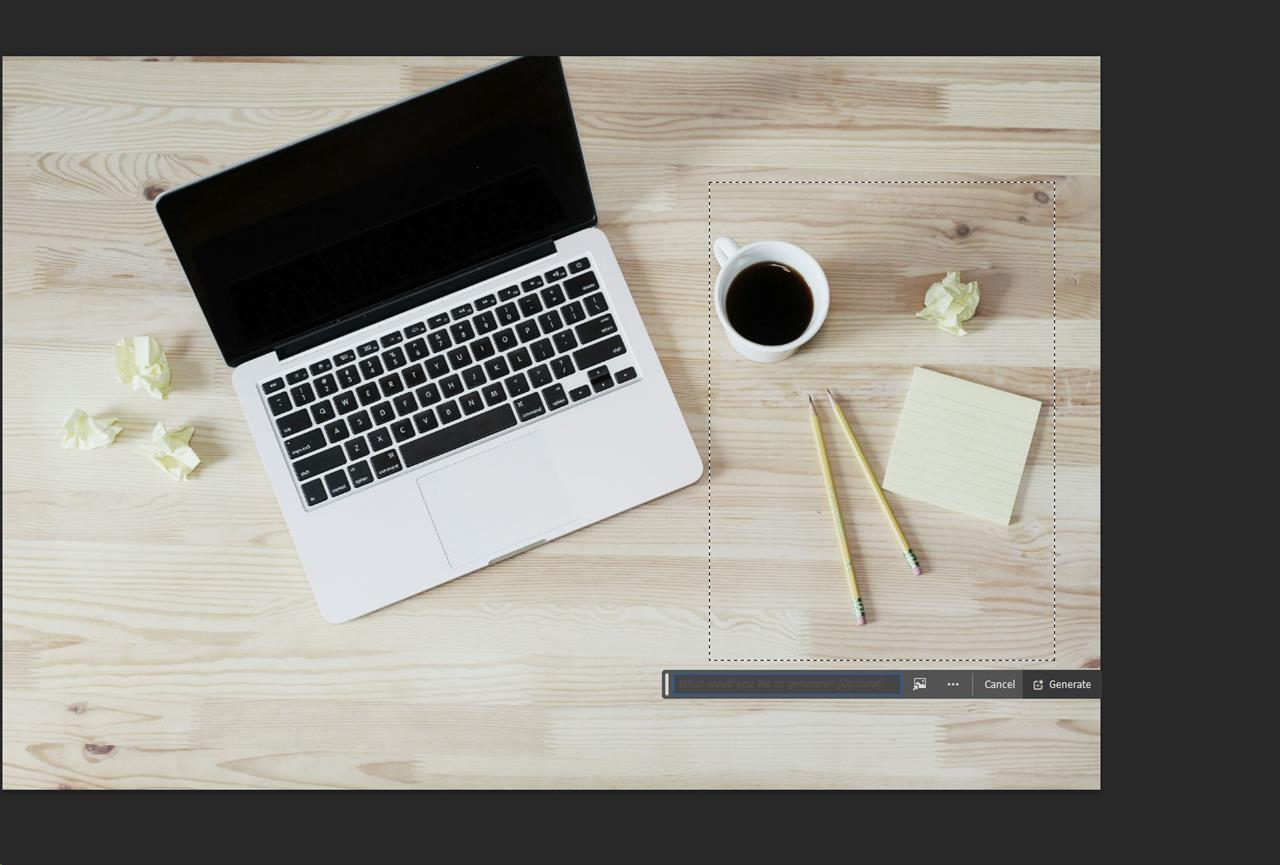
Photo: Jon Martindale/Adobe
Once you’ve selected the object or portion of the image that you want to remove from it, select Generative Fill, but crucially, do not type anything into the text prompt field. Leave it completely blank, then select Generate. This tells the AI that you don’t want anything new put in this place, but do want your selection to closely match what’s around it. Think of it like a super-advanced feather tool.
Wait for the generate function to finish, then use the iterations on the right-hand-side to select your favorite result. If you aren’t 100% happy with how it’s turned out, Undo the generative fill, then select a slightly different area and try generating it again. Each time you use the AI tool it will output a slightly different result.

Photo: Jon Martindale/Adobe
If you still find you aren’t getting what you want, you can manually delete or erase the content from the image, then use generative AI to fill in the blank space afterwards.
How to crop and resize with generative AI in Photoshop
Another handy function of the generative AI is how it can help crop and expand images in Photoshop. To use it, make sure the Contextual Taskbar is open, and select the standard Crop tool from the main toolbar.
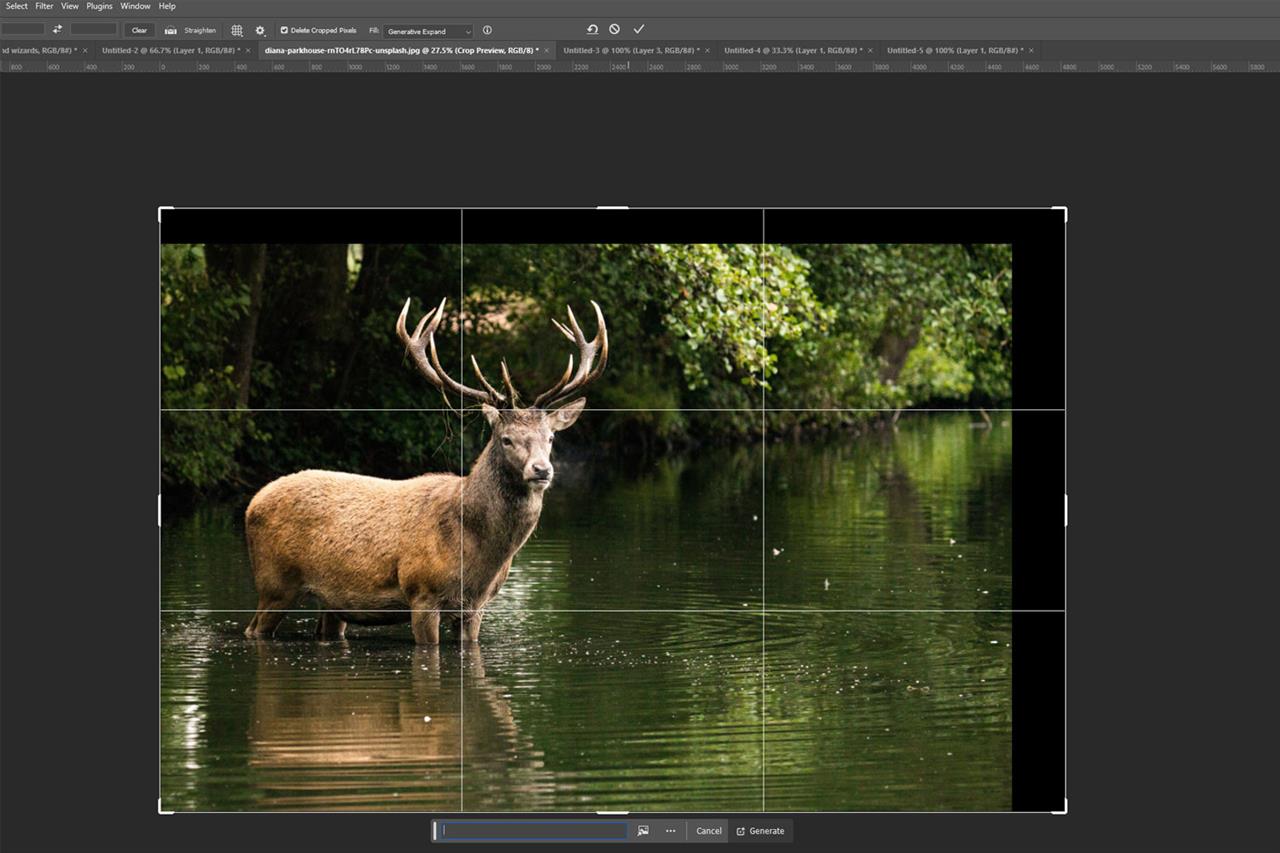
Photo: Jon Martindale/Adobe
Then select your image, and drag it larger, expanding the image and canvas at the same time. Then press Enter or double click to finalize and wait for the AI to generate the new borders of the image. In this case we selected this image of a stag and used the crop tool to expand its right and top-most sides.
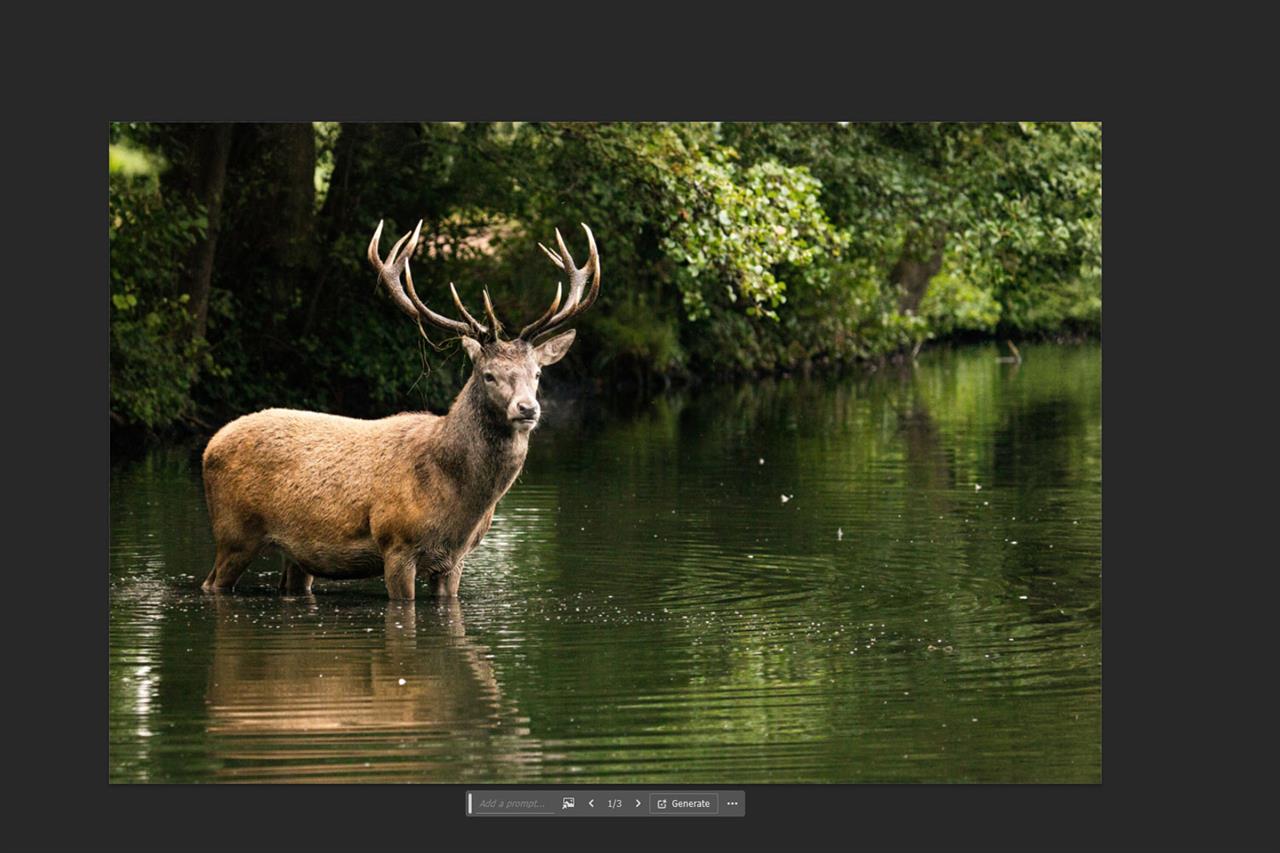
Photo: Jon Martindale/Adobe
As you can see, despite some complexity from the ripples on the water, the reflections, the dust motes in the air, and the leaves in the background, the AI did a stellar job in enlarging this picture. You can resize images of all kinds in this way to make them fit a certain aspect ratio, upscale them for greater size and quality, or expand the viewer’s field of view to create a wider angle or taller image.
Conclusion
Generative AI is one of the most impressive additions to the Photoshop suite of tools in a number of years, and it’s only just getting started. Not only are Adobe users still figuring out what they can do to make the most of these new tools, but Adobe is iterating all the time. New, advanced Firefly image generation models keep changing what’s possible, enhancing and improving what Photoshop can do.
The best way to get a feel for what AI can do is just go in and play with the technology and see what kind of digital AI magic you can muster.
Find system suggestions for running Adobe apps, including Photoshop here: How Powerful Does Your Computer Need to Be to Get the Most Out of Adobe's Creative Suite?
Read more: AI Tools and Tips
- How to Use AI to Grow Your Small Business
- Meet Claude, the Best AI You've Never Heard of
- AI is already changing web browsers. Here’s what’s new
- Microsoft Surface Laptop Review: The First Copilot Plus PC
- How To Use AI to Convert a Photo to a 3D Model
- What is TOPS? The AI Performance Metric Explained
- Copilot Plus PCs vs AI PCs: What's The Difference?
- Hands-on with the Faster, Smarter ChatGPT-4o AI
- Why Coders are Learning to Love Copilot
- How to Get NVIDIA Chat with RTX: Local AI for Everyone
- How to Make Sure Your Next Computer Is AI Ready
Jon Martindale is a freelance technology journalist and writer from Gloucestershire, UK. He's written for a range of publications over a 20-year career, including DigitalTrends, USNews, Forbes, and Lifewire, among many others. Over that time he's written countless how-to guides, best-of lists, hands-on reviews, and in-depth op/ed features.
He has been building and working with computers since his teens, and loves nothing more than trying out the latest components and gadgets to see what they can do. When he isn't staring at a monitor, he can be found chasing after with his two young children, playing board and roleplaying games, or walking his French bulldog cross.


