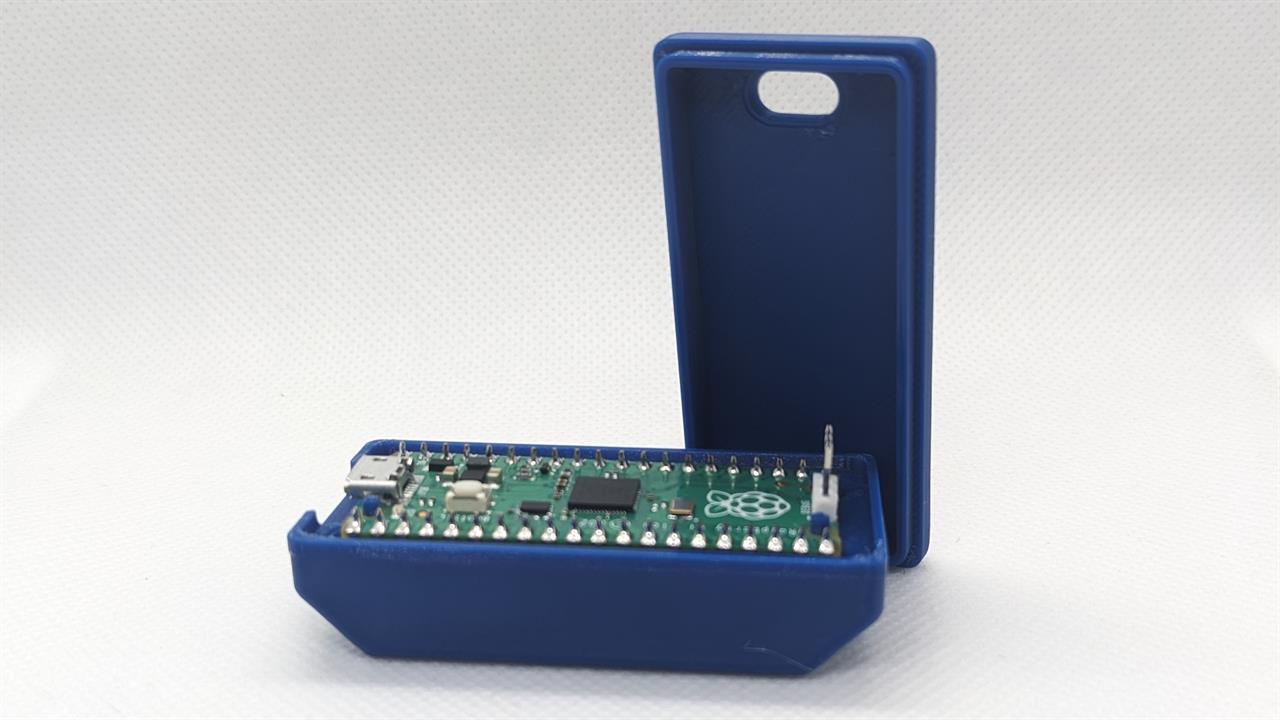
Hands-On with GrabCAD: Building a Raspberry Pi Pico Case
GrabCAD is an incredible tool to create objects for 3D printing, like Raspberry Pi Pico cases.Maker Projects

In 3D printing, turning an idea into a physical object is now more accessible than ever. With platforms like GrabCAD and tools like Fusion 360, aspiring designers and engineers can easily manipulate, design, and prepare models for 3D printing. Our project uses a Raspberry Pi Pico enclosure as an example to illustrate the process from start to finish. This tutorial aims to inspire creativity and innovation by showing how accessible platforms can empower anyone to become a creator. Join us as we navigate the world of digital design and 3D printing, showcasing how these tools can enhance learning and bring ideas into reality.
What we'll be using:
- Inland Blue PLA+:
- Bambu Lab X1C
- Raspberry Pi Pico included with this Starter Kit
- Raspberry Pi Pico Enclosure STL File: https://www.printables.com/model/785742-raspberry-pi-pico-enclosure
Sourcing the Raspberry Pi Pico Model from GrabCAD World of Online Repositories
The journey of transforming an idea into a tangible object begins with the crucial step of finding a suitable model. GrabCAD is an invaluable resource, hosting a vast library of digital models from a global community of engineers, designers, and hobbyists. For our Raspberry Pi Pico enclosure project, the first order of business is sourcing a detailed and accurate model of the Raspberry Pi Pico itself.
Why Choose GrabCAD?
Selecting GrabCAD as the starting point offers several advantages:
· Accessibility: The platform is user-friendly, making it easy for anyone, regardless of their expertise level, to navigate and find what they need.
· Variety: With thousands of models available, GrabCAD provides a wide range of options, ensuring that users can find a model that closely matches their specifications.
· Quality: Professionals and enthusiasts often contribute models on GrabCAD, ensuring a high level of detail and accuracy crucial for any design project
To find the suitable Raspberry Pi Pico model:
1. Search on GrabCAD for one that matches the component and has precise dimensions.
2. Once you've downloaded a suitable model, review its details in CAD software like Fusion 360 to ensure it's accurate and complete.
3. Use the model as a guide and inspiration for customizing an enclosure that fits your needs.
{Thanks to the designer of the Pico model we will be using}
Designing the Enclosure in Fusion 360
Importing the Model
The first step in Fusion 360 is to import the Raspberry Pi Pico model. This straightforward process serves as the foundational block for our enclosure design. Importing the model ensures our design has the exact dimensions and specifications of the Raspberry Pi Pico, which is critical for the fit and functionality of the final product.
Conceptualizing the Enclosure
Designing the enclosure begins with a clear understanding of the project's requirements and constraints. Key considerations include:
· Accessibility: Ensuring easy access to the Raspberry Pi Pico's ports and connectors.
· Ventilation: Designing for adequate airflow to prevent overheating.
· Aesthetics: Considering the enclosure's appearance and how it complements the Raspberry Pi Pico.
· Assembly: Planning how the enclosure will be assembled, including snap-fit components, screws, or other fastening methods.
With Fusion 360, the design process starts with sketching the basic outline of the enclosure, taking into account the previously identified requirements and constraints. These sketches then serve as the basis for 3D modeling, where the enclosure begins to take shape. Fusion 360's tools allow for the easy manipulation of shapes, the addition of features like cutouts for ports, and creating complex geometries for aesthetics and functionality.
Preparing the Enclosure Design for 3D printing
Analyzing and Optimizing the Design
The first step in preparing for 3D printing involves analyzing the design for potential printability issues. This analysis includes checking for supporting overhangs, ensuring wall thickness meets the printer's capabilities, and optimizing the part's orientation for the best print quality and strength. Fusion 360's analysis tools can highlight areas of concern, allowing designers to make necessary adjustments before proceeding.
Slicing the Model
Once the design is optimized for printing, slicing the model is next. Slicing is converting the 3D model into a series of layers and generating the G-code that 3D printers use to create the physical object. While Fusion 360 does not directly slice models, it integrates seamlessly with many slicing software options. Exporting the model in a compatible format, such as STL or OBJ, is straightforward, and you can then import this file into your slicing software of choice.
3D Printing the Enclosure
Bringing the Design to Life
After meticulous planning, designing, and preparation, the project reaches its most exciting phase: 3D printing the Raspberry Pi Pico enclosure. This step transforms our digital model into a tangible object, highlighting the marvels of modern 3D printing technology. The process involves:
· Setting up the 3D printer with the finalized G-code.
· Selecting the appropriate material.
· Monitoring the printing process to ensure everything goes as planned.
Initiating the Print
With the printer prepared and the G-code loaded, the printing process begins. The first few layers are critical and set the foundation for the rest of the print. Watching the initial layer deposition can provide insights into potential issues early on, allowing for adjustments or restarts if necessary.
Monitoring the Print
Although modern 3D printers are highly automated, monitoring the print is advisable, especially for longer prints. This oversight can help identify and mitigate issues like filament tangles, nozzle clogs, or layer shifting before they result in print failure. Some printers come equipped with cameras and remote monitoring capabilities, enabling you to monitor the print process even when you're not physically present.
Post-Processing
You should perform post-processing steps after completing the print to achieve the desired finish and functionality. These steps include removing support structures, sanding rough edges, assembling multipart designs, and applying paint or sealant. The extent of post-processing depends on the enclosure's design, material, and end-use requirements.
Testing and Iteration
With the enclosure printed and post-processed, the next step is to test its fit and functionality with the Raspberry Pi Pico. This testing might reveal areas for improvement, such as tight fits, misaligned ports, or insufficient ventilation. The design process naturally involves iteration, and you can use the insights gained from this testing phase to refine the design further.
Educational Value and Inspiration
This project is a practical exploration of 3D design and printing. We have found that leveraging resources like GrabCAD and engaging with the Fusion 360 community has helped us enhance the creative process through shared knowledge and feedback. The maker movement emphasizes collaboration, promoting innovation and learning through hands-on experiences.