We 3D-Printed a Guitar, and You Can Too

It’s taken months of hard work and troubleshooting, but the Micro Center team now has a stellar new prop: a working 3D printed guitar.
But how did we overcome issues from failed prints to broken screws? And, most importantly: now that's done, how does the guitar sound?
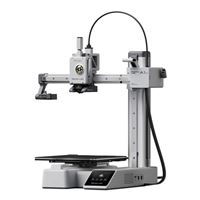
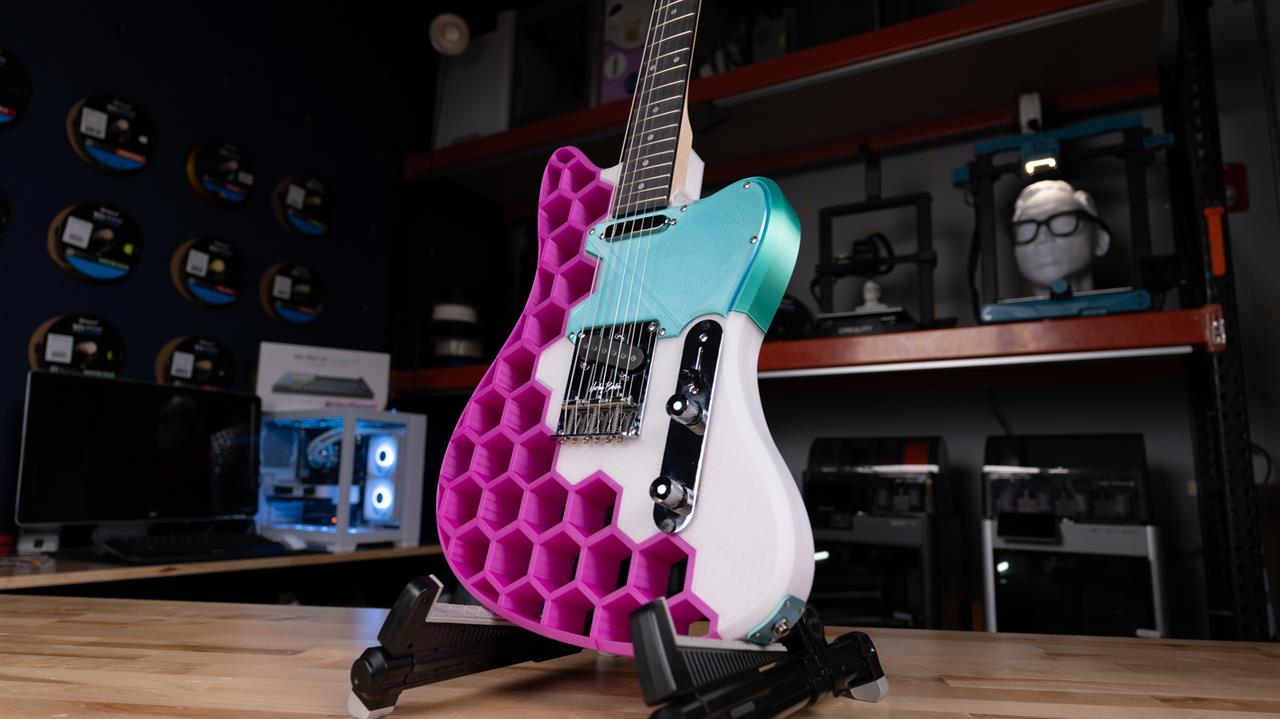 Photo: Jacob Bobo
 The Project
I’d only been 3D printing for just about a year when I got the bug to create something bigger. Most of my projects had been fairly small, utilitarian, and simple, like tabletop game accessories; just one, maybe two prints per project. I wanted to make something bigger, more complicated, and, most importantly, fun.
I stumbled on the Prusacaster while browsing the Printables website for simple guitar accessories and immediately saw the potential. A 3D printed electric guitar was an awesome idea and would challenge my 3D printing skills. I reached out to our 3D printing savant, Jacob, and asked if he would help out with the printing. With Prusa having designed everything around an available-online guitar kit, we figured this was going to be a fairly easy -- though involved -- print. Right?
The Plan
The initial plan was straightforward. We’d set up the files on a few printers and within a couple of days we should be good to start putting the whole thing put together. Maybe an hour or two of assembly, and we’d have a working guitar by the weekend.
But first, we had to settle on a color scheme for the guitar. Initially, we wanted an early 2000’s vibe with translucent parts and visible wires. A few test prints later, we realized we weren’t going to get a truly transparent print. Thankfully, however, we did stumble on three colors we really liked. The majority of the body would be printed with Glass Purple PLA with the accent corner done in Blue-Green Silk PLA. The final piece, the very center, would be done in Clear PETG+, as PETG offers a bit more strength; perfect to counteract the tension from taut guitar strings.
That night, we got to printing. We set a Bambu Labs A1 mini to work on one of the smaller parts of the print and left the first big print to the Creality K1 Max. By the next morning, we had our first real problem.
The Spaghetti Incident
Nothing like a build plate full of spaghetti first thing in the morning. Sometime fairly early into the print, the whole thing had become disconnected from the bed and was now a mess strewn across the printer. We tried printing a few more times on the K1, each time tinkering with bed temperature, nozzle speed, and even breaking out the glue stick, to no avail. It was time to crack it open and see what went wrong.
As it turns out, that first print didn’t just make a mess of the bed, it made a mess of the print head. When Jacob opened it up, he found a mess of melted plastic and filament. It’s impossible to say what caused the initial failure, but this was absolutely what caused the subsequent ones. Theoretically, however, this should be a relatively easy fix. With some patience and tools, scraping the filament off should bring the printer back to life.
Unless you forget to turn it off and accidentally short out the daughterboard with a screwdriver. Which is exactly what happened. We were left with a 3D printer that needed some repairs but no time to fix it. Thankfully, we had backups.
We pivoted to the Sovol SV07 Plus for the rest of our large prints and a few days later, we had printed all the parts we needed.

Assembling the Guitar
With all the pieces printed and the guitar kit in hand, we got to work getting the guitar together. To start, we used standard CA-based super glue to affix all of the pieces together, making sure none would break off when we started strumming. All seemed to hold cleanly, but we did do some light filament soldering – running a piece of filament between two seams and heating it with a soldering iron – to join the two large clear pieces together. As those would be holding all the electronics, we wanted to make sure that we wouldn’t end up with a weak spot on the main body of the guitar.
From there, it was just a matter of connecting the wood neck and electronics to the body. Within an hour, we had the guitar almost completely ready to go.
Broken screws
Unfortunately, two small hiccups reared their heads. First, one of the tuning pegs came without any threads, meaning that we couldn’t finish stringing the guitar. The bigger problem came when we tried to attach the tuning and volume knobs.
These knobs came pre-attached to a metal plate, designed to be screwed into the body with two fairly long screws. We had attached the pickups and bridges already and were expecting a bit of groaning when we added the screws. Like with anything not designed by yourself, there’s always a bit of uncertainty without everything will fit together. The plates we had added weren’t perfectly snug with the screws, and a little bit of pressure was needed to get them to hold. What we weren’t expecting were the screws to snap. The creaking was not the plastic, but the heads of the screws, cracking under the stress.

We were left with the screw threads stuck in the guitar and both the screw heads (and our heads) in our hands. It was time to take a break.
Problem Solving: The Tuning Knobs
Assuming the solution to our un-threaded tuning peg was a simple email, we turned our focus to the tuning knobs. We workshopped a few ideas; we could just super glue it in place, we could try and use filament soldering, we could use a hot glue gun. Or we could use all three?
A week or two went by while we workshopped ideas when our coworker and maker savant Andy (also in the Micro Center Podcast linked above) came by with a revolutionary idea: why not use heat set inserts?
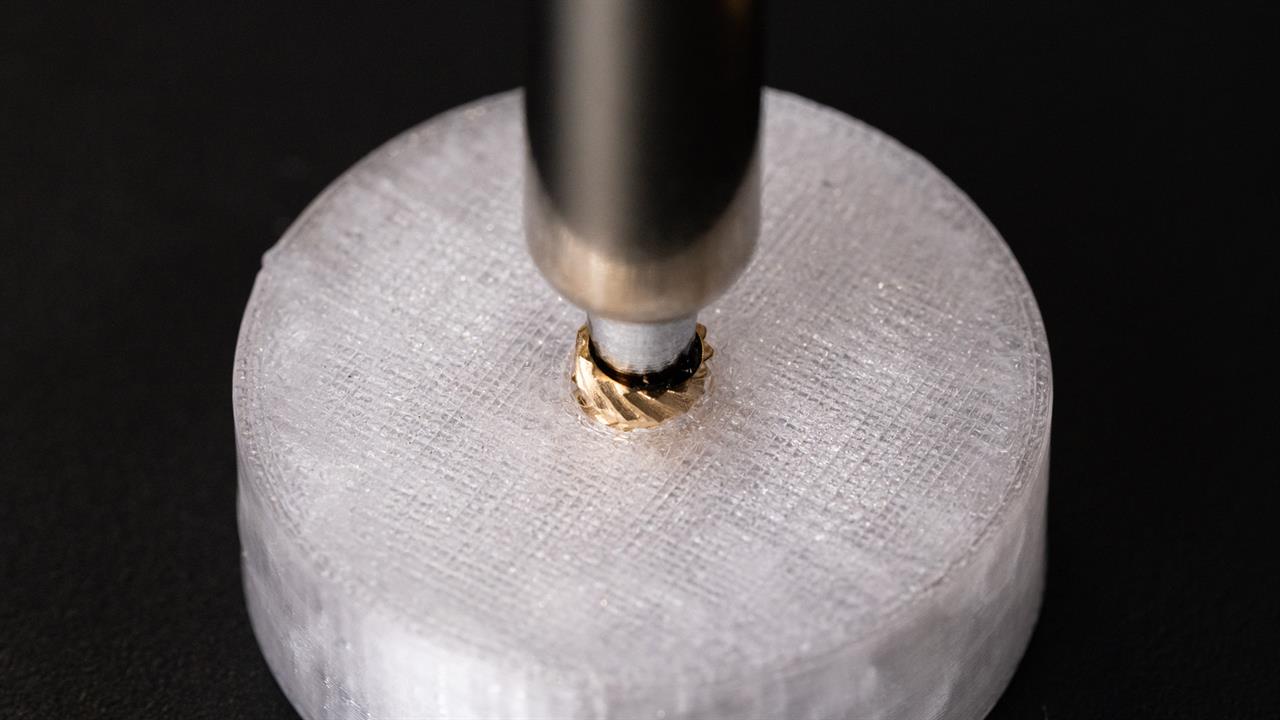 Photo: Jacob Bobo
 Heat set inserts are designed for use with 3D prints. With the help of a soldering iron, they melt the plastic around them and sink into the model, creating a threaded hole, perfect for screws. We’d have to use the soldering iron to heat up the snapped-off screw threads and force them further into the body of the guitar, but this plan seemed like it should solve our issue. We got to work installing some inserts and, lo and behold, they worked like a charm. We had our electronics fully installed.
Problem Solving: The Tuning Peg
The tuning peg issue should have been the easiest fix of all. If only we had known what to call it. While I’ve been dabbling with the guitar on and off since I was young, I’d never learned the ins-and-outs of what everything was. I assumed it was just some sort of screw that we didn’t know the size of.
Thankfully, Andy came to our rescue once again. Turns out, he’s also quite the guitar player. While we were struggling to figure out what to call the unthreaded piece, he quickly found a replacement tuning peg. Suddenly, the end was in sight. We got the final piece put together, strung the guitar, and we were ready to see how it played.
Playing the Prusacaster
Two months after we started, we had the Prusacaster hooked up to an amp. Some light tuning later, and we were finally ready to rock. The sound was solid, though definitely felt a little bit hollow compared to solid built, professional guitars. But the Prusacaster isn’t a professional guitar and was never meant to be one. The sound may not be as clean as a Fender and it tends to slip out of tune fairly easily. We assume this is due to the softer, plastic body of the guitar getting ever-so-slightly pulled by the tension in the strings. But at the end of the day, it plays well, sounds decent enough, and besides, how many people can say they printed and built their own guitar?
What We Learned
The Pruscaster project ended up being more of an ordeal than any of us expected. Every time we thought we had things figured out, a new problem popped up that we had no idea how to solve. Without the help of Andy and Jacob, I would still be sitting with the K1 Max, adjusting settings and trying to get the filament to stick to the bed.
Cliches though they may be, there are two big lessons to take from this:
- Be Patient. You never know what may go wrong, and getting frustrated at the project doesn’t solve anything. Our best problem solving came when we took a step back and really thought about how to proceed.
- Ask for help. Andy saved our bacon this time with quick and easy solutions neither Jacob nor I would have thought of. His solutions were easy and elegant and, had we gone to him sooner, would have got us to the finish line way sooner.
This project took a lot of collaboration, hard work, and creative ideas. It was an intimidating project, but ultimately came together beautifully. If you’ve got a big project you’ve been putting off, take this as your sign to start. It might not go perfectly, but trial and error is part of what makes 3D printing such a rewarding hobby. And, if you do run into problems, stop by your local Micro Center. Our knowledgeable Maker staff will be happy to talk with you through your project and might even come up with solutions that you didn’t know existed.
Get printing and rock on.