New to 3D Printing? Here are our top 5 rules for successful printing.

Written by Andy Leer
You’ve just picked up your first 3D printer. You’re excited to print all of your favorite characters or figures from that hot new video game/anime/TV show. You follow all instructions for installation, watch a few youtube videos, slice your first file, send the print to the machine, and shazam! A failed print? What went wrong? What should you have done differently? There are so many variables in 3D printing, so let's break down some of the most common pain points for new 3D print enthusiasts.

1) Understand the tool you are using and its true capabilities.
3D printers, while yes still magical, aren’t without limitations. Printing items that are too detailed, have many features that flow in many directions, and require a lot of supports are tough to print if you’re new to the hobby. Do not get discouraged though, with time, practice, and experience you’ll learn what the printer is truly capable of and be able to make better judgment calls when looking at how a model may be produced.

2) Respect the filament spool!
One of the biggest pieces of advice I give people when they are getting started is to really watch when opening, changing out, or replacing filament spools. Veterans of 3D printing will be glad to recount to you the number of times they’ve come back to a print where the head is still moving about 25-30mm above the print bed with nothing extruding. This is often likely due to either a clog or, potentially more often, a snag in the spool. If the spool is not kept taught while changing, loading, storing, and initially unpackaging, there is the potential for the filament to unravel underneath itself and cause the filament to snag, preventing it from continuing its path down the filament tube.

3) Clean your bed.
I personally tend to not be too adventurous when it comes to my printers at home, sticking mostly to our Inland PLA+. However, bed adhesion is still a major concern of mine. I am typically not the biggest fan of applying adhesive sticks or goops unless the print really requires it. What I find to be much more effective is ensuring you have the right print surface for the material you are using and ensuring that it is clean. On my printers I have a stock glass bed and an upgraded PEI sheet. Both have great adhesion if maintained. Cleaning with isopropyl alcohol between every few prints makes sure that no dust or oil is getting in the way of an excellent union between the print and the bed.
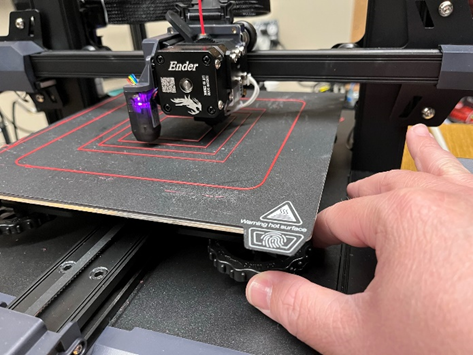
4) Learn to manually level.
While the promise of autobed leveling has been around for quite some time, some with many multipoint checks that ensure a proper mapping in the firmware of how the bed actually is, to me nothing quite beats a good old run of CHEP’s bed leveling file and some on the fly fine-tuning. Getting a feel for what the first layer of a print should really look like is important and ensures good adhesion to a clean bed. When printing smaller parts that require high tolerance, being a little bit off can be the difference between something working well and not working at all.