
- Did You Mean: "docking stations"
- Category Suggestions:
- Laptop Docking Stations
Special Offers / Advertisements
Compare up to 4 items
New list of matching products
X
Sorry, you may compare a maximum of 4 items at a time.
Please clear one or more of your compare items before adding another-
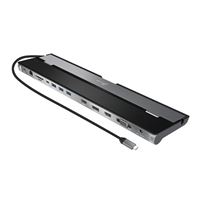
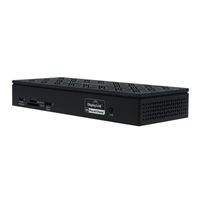
Usually ships in 5-7 business days.Our price $109.99
-
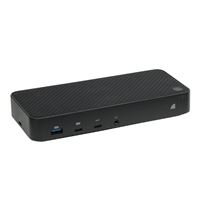
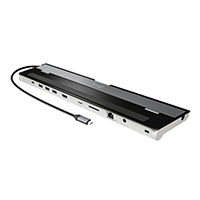
Usually ships in 5-7 business days.Our price $179.99
-
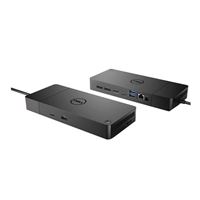
Usually ships in 5-7 business days.Our price $199.99
-
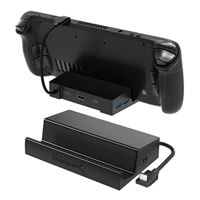
Usually ships in 5-7 business days.Our price $39.99
-
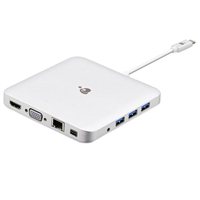
SKU: 578237
- Triple Display
- 1GB Ethernet
- 100W Power Delivery
- Triple Display
- 1GB Ethernet
- 100W Power Delivery
Usually ships in 5-7 business days.Our price $89.99 -
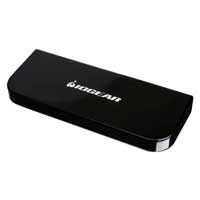
Usually ships in 5-7 business days.Our price $299.99
-
Usually ships in 5-7 business days.Our price $49.99
-
Usually ships in 5-7 business days.Our price $59.99
-
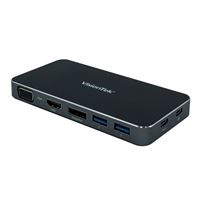
SKU: 543983
- Up to 3840 x 2160
- HDMI DisplayPort
- Up to 3840 x 2160
- HDMI DisplayPort
Usually ships in 5-7 business days.Our price $639.99 -
Usually ships in 5-7 business days.Our price $79.99
-
Usually ships in 5-7 business days.Our price $344.99
-
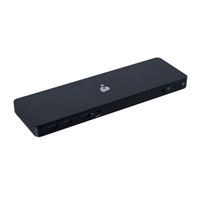
Usually ships in 5-7 business days. Limited availability. May not be in stock at time of order. No back orders.Our price $99.99
-
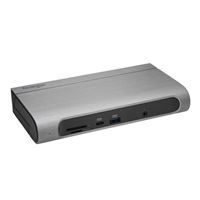
SKU: 553263
- Up to 4096 x 2160 Resolution
- HDMI DisplayPort
- Up to 4096 x 2160 Resolution
- HDMI DisplayPort
Usually ships in 5-7 business days. Limited availability. May not be in stock at time of order. No back orders.Our price $239.99 -
Usually ships in 5-7 business days. Limited availability. May not be in stock at time of order. No back orders.Our price $107.99
-
SKU: 213736
Usually ships in 5-7 business days. Limited availability. May not be in stock at time of order. No back orders.Our price $299.99 -
Usually ships in 5-7 business days.Our price $114.99
-
Usually ships in 5-7 business days.Our price $349.99
-
Usually ships in 5-7 business days.Our price $264.99
-
SKU: 562751
- Up to 7680 × 4320 Resolution
- HDMI DisplayPort
- Up to 7680 × 4320 Resolution
- HDMI DisplayPort
Usually ships in 5-7 business days.Our price $339.99 -
SKU: 553271
- Up to 4096 x 2160 Resolution
- HDMI DisplayPort
- Up to 4096 x 2160 Resolution
- HDMI DisplayPort
Usually ships in 5-7 business days.Our price $349.99 -
SKU: 086306
- Power Delivery
- Up to 3840 x 2160 Resolution
- HDMI DisplayPort
- Power Delivery
- Up to 3840 x 2160 Resolution
- HDMI DisplayPort
Usually ships in 5-7 business days.Our price $149.99 -
Usually ships in 5-7 business days.Our price $259.99
-
SKU: 508788
- Triple 4K Displays
- 100W Power Delivery
- Triple 4K Displays
- 100W Power Delivery
Usually ships in 5-7 business days.Our price $349.99 -
Usually ships in 5-7 business days. Limited availability. May not be in stock at time of order. No back orders.Our price $129.99


Special Offers / Advertisements
{
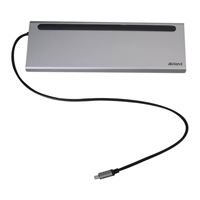
'name': 'JCD543 USB-C Triple Display Docking Station',
'id': '667446',
'price': '109.99',
'brand': 'j5create',
'category': 'Laptop Docking Stations|462',
'list': 'Search Results',
'position': 1
},{
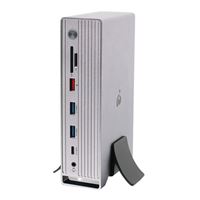
'name': 'Universal Hybrid Displaylink Docking Station',
'id': '668014',
'price': '179.99',
'brand': 'Inland',
'category': 'Laptop Docking Stations|462',
'list': 'Search Results',
'position': 2
},{
'name': 'WD19S USB-C, USB-A, HDMI, DP, RJ-45 Docking Station',
'id': '638959',
'price': '199.99',
'brand': 'Dell',
'category': 'Laptop Docking Stations|462',
'list': 'Search Results',
'position': 3
},{
'name': '6-Port Docking Station for Steam Deck',
'id': '664042',
'price': '39.99',
'brand': 'Sabrent',
'category': 'Laptop Docking Stations|462',
'list': 'Search Results',
'position': 4
},{
'name': '11-1 USB Type-C Laptop Docking Station',
'id': '667448',
'price': '89.99',
'brand': 'Inland',
'category': 'Laptop Docking Stations|462',
'list': 'Search Results',
'position': 5
},{
'name': 'Dock Pro Universal 4K Quad Docking Station',
'id': '651932',
'price': '299.99',
'brand': 'IOGear',
'category': 'Laptop Docking Stations|462',
'list': 'Search Results',
'position': 6
},{
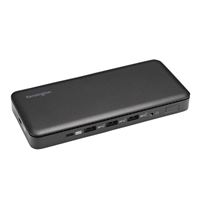
'name': 'SD4839P USB-C 10Gbps Triple Video Driverless Docking Station',
'id': '677152',
'price': '49.99',
'brand': 'Kensington',
'category': 'Laptop Docking Stations|462',
'list': 'Search Results',
'position': 7
},{
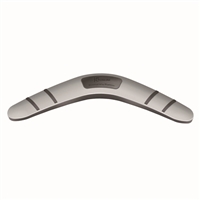
'name': 'USB 3.0 Boomerang Universal Docking Station JUD480',
'id': '630973',
'price': '59.99',
'brand': 'j5create',
'category': 'Laptop Docking Stations|462',
'list': 'Search Results',
'position': 8
},{
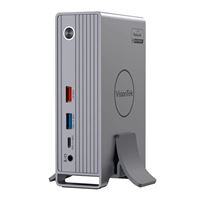
'name': 'VT8000 Quad Display Docking Station',
'id': '662911',
'price': '639.99',
'brand': 'Visiontek',
'category': 'Laptop Docking Stations|462',
'list': 'Search Results',
'position': 9
},{
'name': 'USB-C 4K HDMI Docking Station',
'id': '656770',
'price': '79.99',
'brand': 'j5create',
'category': 'Laptop Docking Stations|462',
'list': 'Search Results',
'position': 10
},{
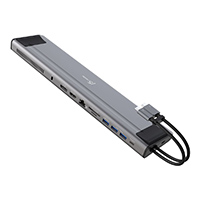
'name': 'HyperDrive Thunderbolt 4 Docking Station',
'id': '652572',
'price': '344.99',
'brand': 'Hyper',
'category': 'Laptop Docking Stations|462',
'list': 'Search Results',
'position': 11
},{
'name': 'USB 3.0 Universal Docking Station',
'id': '431489',
'price': '99.99',
'brand': 'IOGear',
'category': 'Laptop Docking Stations|462',
'list': 'Search Results',
'position': 12
},{
'name': 'GUD3C4K2TAA Dock Pro Universal Dual View Docking Station',
'id': '663410',
'price': '239.99',
'brand': 'IOGear',
'category': 'Laptop Docking Stations|462',
'list': 'Search Results',
'position': 13
},{
'name': 'Compact USB-C Docking Station with PD Pass-Thru',
'id': '483723',
'price': '107.99',
'brand': 'IOGear',
'category': 'Laptop Docking Stations|462',
'list': 'Search Results',
'position': 14
},{
'name': 'SD5600T Thunderbolt 3 and USB-C Dual 4K Hybrid Docking Station - 100W PD – Win/Mac',
'id': '631822',
'price': '299.99',
'brand': 'Kensington',
'category': 'Laptop Docking Stations|462',
'list': 'Search Results',
'position': 15
},{
'name': 'VT200 Dual Display USB-C Docking Station with Power Passthrough',
'id': '646133',
'price': '114.99',
'brand': 'Visiontek',
'category': 'Laptop Docking Stations|462',
'list': 'Search Results',
'position': 16
},{
'name': 'Performance Dock WD19DCS Docking Station with 240W Power Adapter',
'id': '660441',
'price': '349.99',
'brand': 'Dell',
'category': 'Laptop Docking Stations|462',
'list': 'Search Results',
'position': 17
},{
'name': 'VT4000 Dual 4K Display Universal Docking Station (USB Types A or C)',
'id': '621158',
'price': '264.99',
'brand': 'Visiontek',
'category': 'Laptop Docking Stations|462',
'list': 'Search Results',
'position': 18
},{
'name': 'Dock Pro USB4 8K Triple View Docking Station',
'id': '664904',
'price': '339.99',
'brand': 'IOGear',
'category': 'Laptop Docking Stations|462',
'list': 'Search Results',
'position': 19
},{
'name': 'Dock Pro Duo USB Type-C Docking Station',
'id': '663409',
'price': '349.99',
'brand': 'IOGear',
'category': 'Laptop Docking Stations|462',
'list': 'Search Results',
'position': 20
},{
'name': 'VT2000 USB-C Display Docking Station',
'id': '621156',
'price': '149.99',
'brand': 'Visiontek',
'category': 'Laptop Docking Stations|462',
'list': 'Search Results',
'position': 21
},{
'name': 'DX2 Dual 4K Display Universal Docking Station',
'id': '666661',
'price': '259.99',
'brand': 'ALOGIC',
'category': 'Laptop Docking Stations|462',
'list': 'Search Results',
'position': 22
},{
'name': 'VT7100 USB-C Docking Station',
'id': '659810',
'price': '349.99',
'brand': 'Visiontek',
'category': 'Laptop Docking Stations|462',
'list': 'Search Results',
'position': 23
},{
'name': 'JCD552 M.2 NVMe USB Type - C Gen 2 Docking Station - Grey',
'id': '656409',
'price': '129.99',
'brand': 'j5create',
'category': 'Laptop Docking Stations|462',
'list': 'Search Results',
'position': 24
}