
How to save space on Solid State Drives (SSDs) in Windows 10 - Part 5
Description: This article will show you how to move User directories to a storage drive instead of your C:\ drive in Windows 10. The User Directories are the folders such as Documents, Pictures, Videos, etc…, which are stored in your user directory. In this document we will move these to save space. We will be moving these directories from the C:\ drive to the D:\ drive. This configuration may be different on your system, so make sure the drive letters are right with the way your system is configured.
Backup suggestion: It is always a good idea to make sure you have a good backup copy of your important data files before proceeding with a process like this.
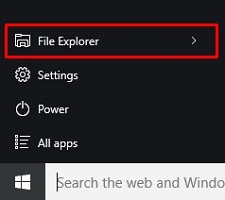
- Click the Start button at the bottom left corner of the screen and select File Explorer.
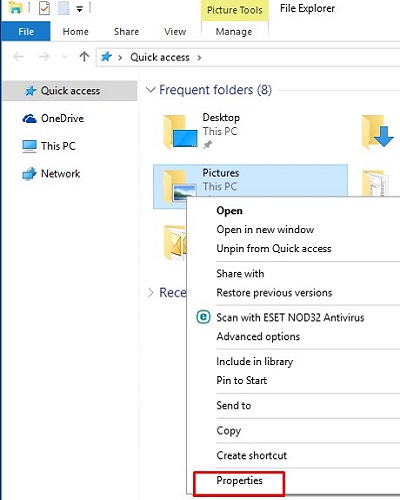
- Once File Explorer opens, right click the Pictures folder and then click Properties.
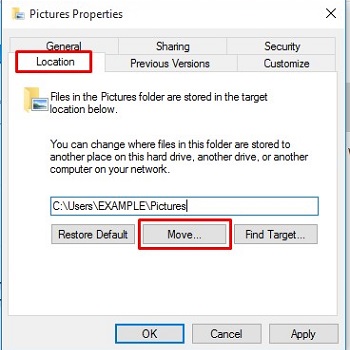
- In the Pictures Properties window, click the Location tab at the top and then click Move.
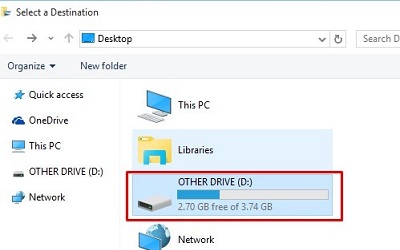
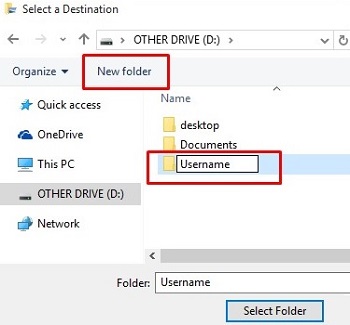
- The next box prompts us to Select a Destination. Double click on the storage drive that is the desired destination. In this example, the D:\ drive.
- Next, click New Folder and choose a name for the folder. I would suggest using your username as the name of the folder. If you are not sure what the username is, look back at step 3 and in the bar where you see C:\Users\EXAMPLE\Pictures, the word EXAMPLE is where your username will be.
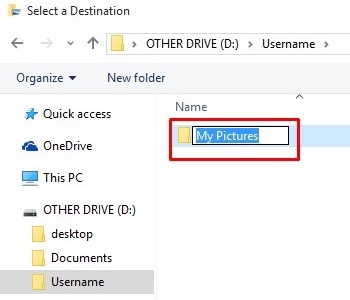
- Once the folder has been created and named, double click on it to open it and then create a new folder here as well. Name this folder My Pictures.
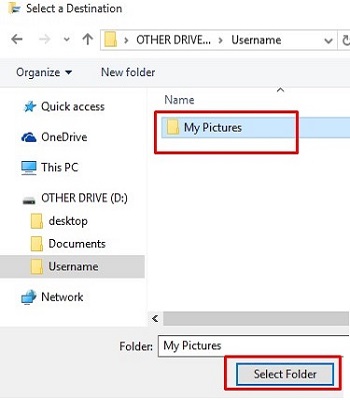
- After that folder has been created and named, make sure it is highlighted in blue which indicates it is selected. Then click Select Folder.
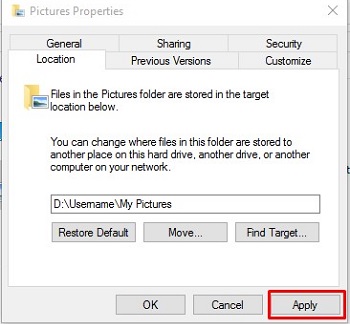
- Click Apply in Picture Properties to complete the process. This will then move anything currently stored in the folder. Repeat this process for any other system directory folders you would like to move.
This article is part 5 of a 6 part series.
Part 1 of this set, Paging File, can be found here.
Part 2 of this set, Disabling Hibernation, can be found here.
Part 3 of this set, System Restore, can be found here.
Part 4 of this set, Indexing Files, can be found here.
Part 6 of this set, Program Directory Location, can be found here.
Technical Support Community
Free technical support is available for your desktops, laptops, printers, software usage and more, via our new community forum, where our tech support staff, or the Micro Center Community will be happy to answer your questions online.
Forums
Ask questions and get answers from our technical support team or our community.
PC Builds
Help in Choosing Parts
Troubleshooting