
How to save space on Solid State Drives (SSDs) in Windows 10 - Part 1
Description: This is a technical article on the topic of saving space on Solid State Drives. Part One covers moving the Paging File. The purpose of this article series is to show how to save space on Solid State drives, which are typically smaller than standard hard drives. In this article we will use a secondary hard drive, presumed to be larger than the solid state drive, as sort of a repository, so we may move files from the faster SSD drive to the bigger standard hard drive.
Paging File: The first, easiest, and biggest file to be moved is the paging file. The paging file is like a backup of the RAM in your computer, so it is a large, mostly empty file that simply waits for Windows to input information to it. We will be moving this from the C:\ drive (SSD) to the D:\ drive (HDD). This configuration may be different in your system, so make sure the drive letters are right with the way your system is configured.
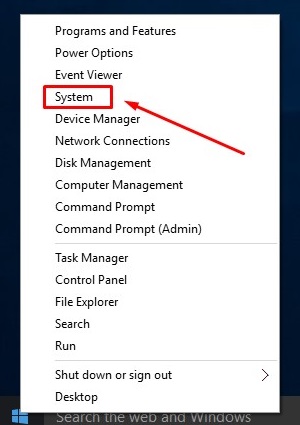
- From the Windows 10 Desktop, move your cursor directly into the lower left corner and right click the Start Button to reveal the Context Menu select System.
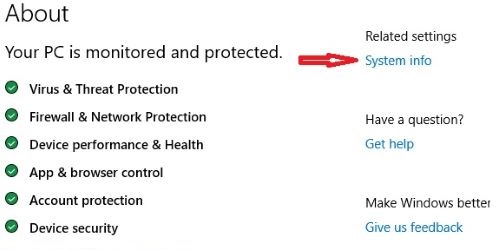
- Choose System Info under Related Settings.
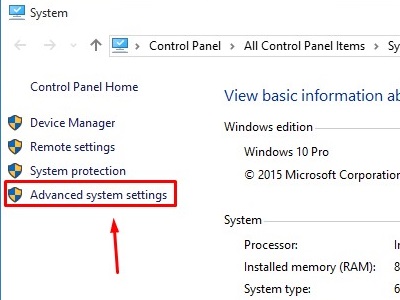
- Once System is open, select Advanced system settings.
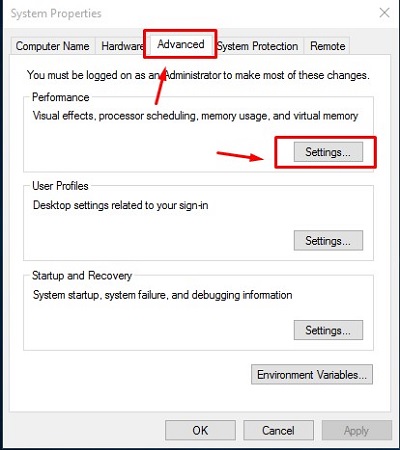
- In System Properties, make sure the Advanced tab is selected and then select Settings.
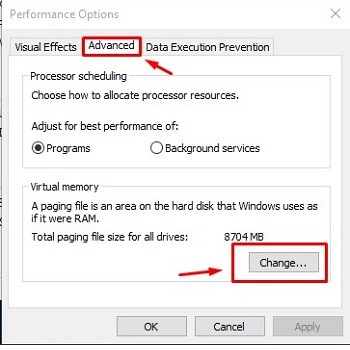
- Open the Advanced tab in Performance Options and then select Change.
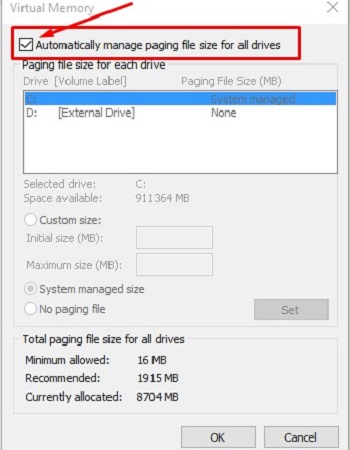
- The Virtual Memory box will appear. Uncheck the box beside Automatically manage paging file size for all drives.
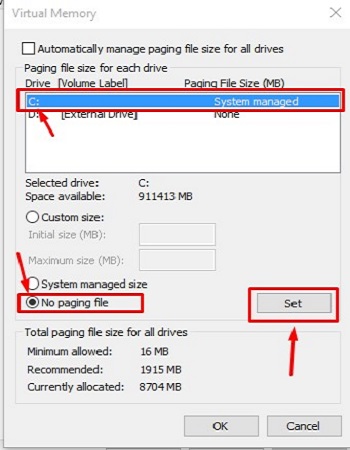
- Make sure the C: drive is selected, then check No paging file and choose Set.
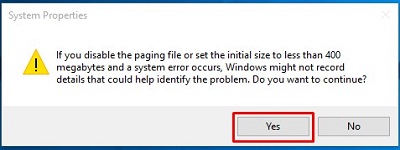
- A System Properties box will appear, choose Yes.
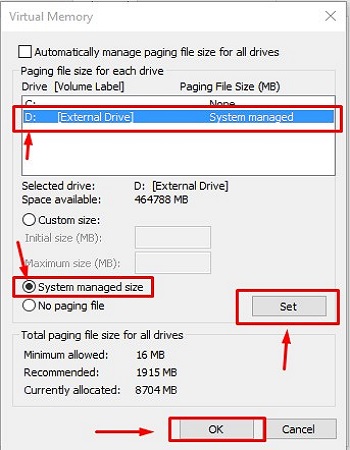
- Next, make sure the D: drive (or whatever drive you want to use) is selected. Then check System managed size, then Set and finally select OK.
- Close out of these boxes and windows and restart the computer to finalize the changes.
This article is part 1 of a 6 part series.
Part 2 of this set, Disabling Hibernation, can be found here.
Part 3 of this set, System Restore, can be found here.
Part 4 of this set, Indexing Files, can be found here.
Part 5 of this set, User Directory Location, can be found here.
Part 6 of this set, Program Directory Location, can be found here.
Technical Support Community
Free technical support is available for your desktops, laptops, printers, software usage and more, via our new community forum, where our tech support staff, or the Micro Center Community will be happy to answer your questions online.
Forums
Ask questions and get answers from our technical support team or our community.
PC Builds
Help in Choosing Parts
Troubleshooting